Skil (Skilsaw) 1616 Chainsaw repair
This project is a bit out of the ordinary for what I usually work on, but now that I have moved back to Seattle, my “services” are called upon sometimes to help with some upkeep around my folks’ place. Last winter a large limb came down in the back yard and I offered to help them out by cutting it up with the small 1976 Skilsaw chainsaw I have had (and used) for many years. I figured it would be an easy Saturday project, that is until I tried to start the saw!
You see, as it turns out, I was the last one to use it and that was over seven years ago, right before I left for graduate school at MIT. Worse, I had last filled the saw with gasoline containing 10% ethanol (aka “gasohol”). Oops. As I have since learned, one should NEVER use gasohol (as is found at the vast majority of gas stations in the US) in small or vintage engines for the following reasons:
- Ethanol will, over time, attack rubber gaskets, hoses, and diaphragms. Gasoline, primarily made of hexane, is a purely non-polar solvent. Water, by contrast is a purely polar solvent. The old saying is “like dissolves like,” so ethanol, which is missable in (mixes with) both non-polar and polar solvents can dissolve materials that purely polar or purely non-polar solvents cannot. Nitrile rubber (aka NBR or Buna-N) was commonly used for fuel lines, gaskets, and carburetor diaphragms before gasohol was common. It is nominally insoluble in ethanol, but if allowed to soak for long periods of time (months / years) or if the rubber is poorly vulcanized or already partially degraded it will cause the rubber to swell and eventually turn to a sticky black mess as it is degraded and/or depolymerized.
- Ethanol is hydroscopic which means it absorbs water. Not only is ethanol is missable with water but worse it actually absorbs water out of the air like a desiccant. This is a serious problem because water in the fuel will not only cause an engine to run poorly but will also start to corrode metal parts if allowed to sit for a long period of time.
- The third problem with gasohol is the worst. Just as wine turns to vinegar if exposed to the air for a long time, ethanol oxidizes to acetic acid by the following equation:

This means that if gasohol is exposed to the air the ethanol in it will degrade into a concentrated solution of acetic acid (vinegar). This is really bad because a mixture of gasoline (a strong non-polar solvent), water (a strong polar solvent), ethanol, and acid will attack most common materials. I have seen old gasohol completely corrode a brass carburetor float to the point that it would fall apart when disturbed. Worse, an attempt to properly store an engine by “running it dry” before putting it away for the off season has the effect of assuring that the residual gas in the system is now thoroughly mixed with plenty of air and so it can oxidize quickly and completely. Oops! - Finally, and this is only somewhat related to ethanol content, a lot of small 2-cycle engines are actually high compression. Ten to one is not uncommon in chainsaw engines for example. Thus, they should be run with a high octane fuel to avoid knocking.
It is thus strongly advisable to only run small engines on pure gasoline, ideally high octane, and combined with a fuel stabilizing additive. There are some gas stations left that still sell “ethanol free premium” (Spirit is the one that happens to be close to me) but barring that ethanol free gasoline can be found at most marine gas stations or places that sell aviation gas. You can also get high quality ethanol free gasoline (including pre-mixed 2-cycle fuel) in cans at any hardware store under brands like “TruFuel.” Yes, this is several times more expensive than fuel from a gas station, but if you are like me and go through at most one gallon of fuel in small engines per season, the cost is much lower than having to dismantle and rebuild the fuel system of your equipment every spring! Plus, I enjoy the convenience of not having to mix 2-cycle fuel.
OK. With the cause of the problem identified, it was back to surveying the extent of the damage. The first thing I saw was that the fuel hose was cracked near the carburetor. I tried to pull it out of the tank and quickly realized that the whole fuel system needed to be rebuilt:
- The fuel line was soft and gooey – it was completely degraded.
- The carburetor needed a total rebuild – the diaphragms were stiff as cardboard and the whole thing stank of vinegar.
- The fuel and oil tank gasket needed to be replaced – it broke when I took the tank apart and was obviously swelled and melted.
- The fuel filter was shot – it is made of polyurethane foam and crumbled when disturbed.

Figure 1: Photo of the bad fuel system parts
This would all be pretty easy if parts were still available, but alas, very few still are for this saw. Knowing me, though, I couldn’t just walk away from the project. What follows is my (slightly heroic) efforts to revive it and some very useful information for the next poor tinkerer that needs (or wants) to work on one of these fine saws.
Before beginning I needed a manual. I found two sources for one – there are paper reprints available for sale on eBay and I eventually found a scanned version of the manual as well. Note that this manual corresponds to the original version of the Skil 1614 and 1616 without the chain brake. There was a later version as well, but mine is the original.
Before I could rebuild the saw I had to find replacements for the bad parts. I started first with the easy one – the fuel line. A quick bit of work with a caliper and it turned out to be 1/8″ID x 1/4″OD x 7.5″ long. Note that both the inside and outside diameters are critical since it must fit tightly over the nipple on the carburetor and the outside of the hose must seal to the rubber grommet in the fuel tank. The original material is nitrile, but Viton fuel line with these dimensions was easier to find and should hold up better. I ended up buying a length of fuel line off of eBay which worked perfectly.
Second was the carburetor rebuild kit. There were two carburetors used in this saw, the Walbro WA8 (aka W8A), and the Tillotson HU-4A. My saw uses the Walbro which needs a Walbro K10-WAT rebuild kit. This kit is nominally obsolete, but both OEM and aftermarket kits are still readily available. I got one marked as OEM (but which I think is actually a good quality aftermarket kit) from Amazon.
Third was the fuel tank gasket. To reproduce this part I carefully glued the original gasket back together, placed it in a plastic bag, and scanned it with a flatbed scanner. Then, working from the scan in Rhinoceros 3D, I attempted to create a drawing of what the original gasket would have looked like before it was distorted from being compressed in the saw. Once I had what I thought was an acceptable drawing I cut a sample out of paper to make sure it fit. A couple of go-rounds of this and I had a workable gasket design. I could have cut them out myself, but instead opted to have it done by Gaskets to Go, a small company that specializes in making custom gaskets. The results were acceptable but not great. I was expecting them to use a CNC cutter to make the gaskets, but they were instead made by hand and looked very hand-made. Next time I think I would go with a different service or just cut them out by hand myself. In any case, even if they didn’t look great, the new gaskets worked fine. The scans and drawings are available at the end of this article.

Figure 2: Original and replacement tank gaskets
Finally, and the hardest, was the fuel filter. This is where things got interesting. It is important that a chainsaw be able to run no matter if a cut is being made horizontally or vertically. This means that fuel must be able to be drawn from the tank in both orientations. Most saws accomplish this by having a weighted fuel filter that is free to fall to the bottom of the tank. However, this saw uses a more ingenious method. The fuel filter is made of a very fine filter foam which, like a fuel cell in a race car, soaks up and holds gasoline like a sponge allowing the engine to be fed a continuous supply of fuel in either orientation. The original foam was totally disintegrated and needed to be replaced. With a bit of research, I determined that it was most likely made of reticulated polyurethane foam. Reticulated foam has the walls of the individual foam cells were removed to leave only the thicker strands of material between the cells, thus making the foam “open cell” and allowing fluid to pass through it. The critical parameter of reticulated foams is the density of cells, measured in pores per inch or ppi. To measure the ppi of the original filter I set an electronic caliper to 0.1″, placed it on the foam filter, and counted the pores under a microscope. I got approximately 100ppi.

Figure 3: Measuring the pores per inch of the fuel filter foam
Next I contacted a couple of companies about having custom foam filters made. New England Foam was very helpful and offered me a very reasonable price on new custom-made filters. It took a couple of go-rounds and a new tool, but in the end I got very high quality replacement filters at a reasonable price. These filters are currently available for sale on this site and on eBay; just search for “Skil 1616 Fuel Filter”. (Note that the same filter will also work in the Skil 1614.)
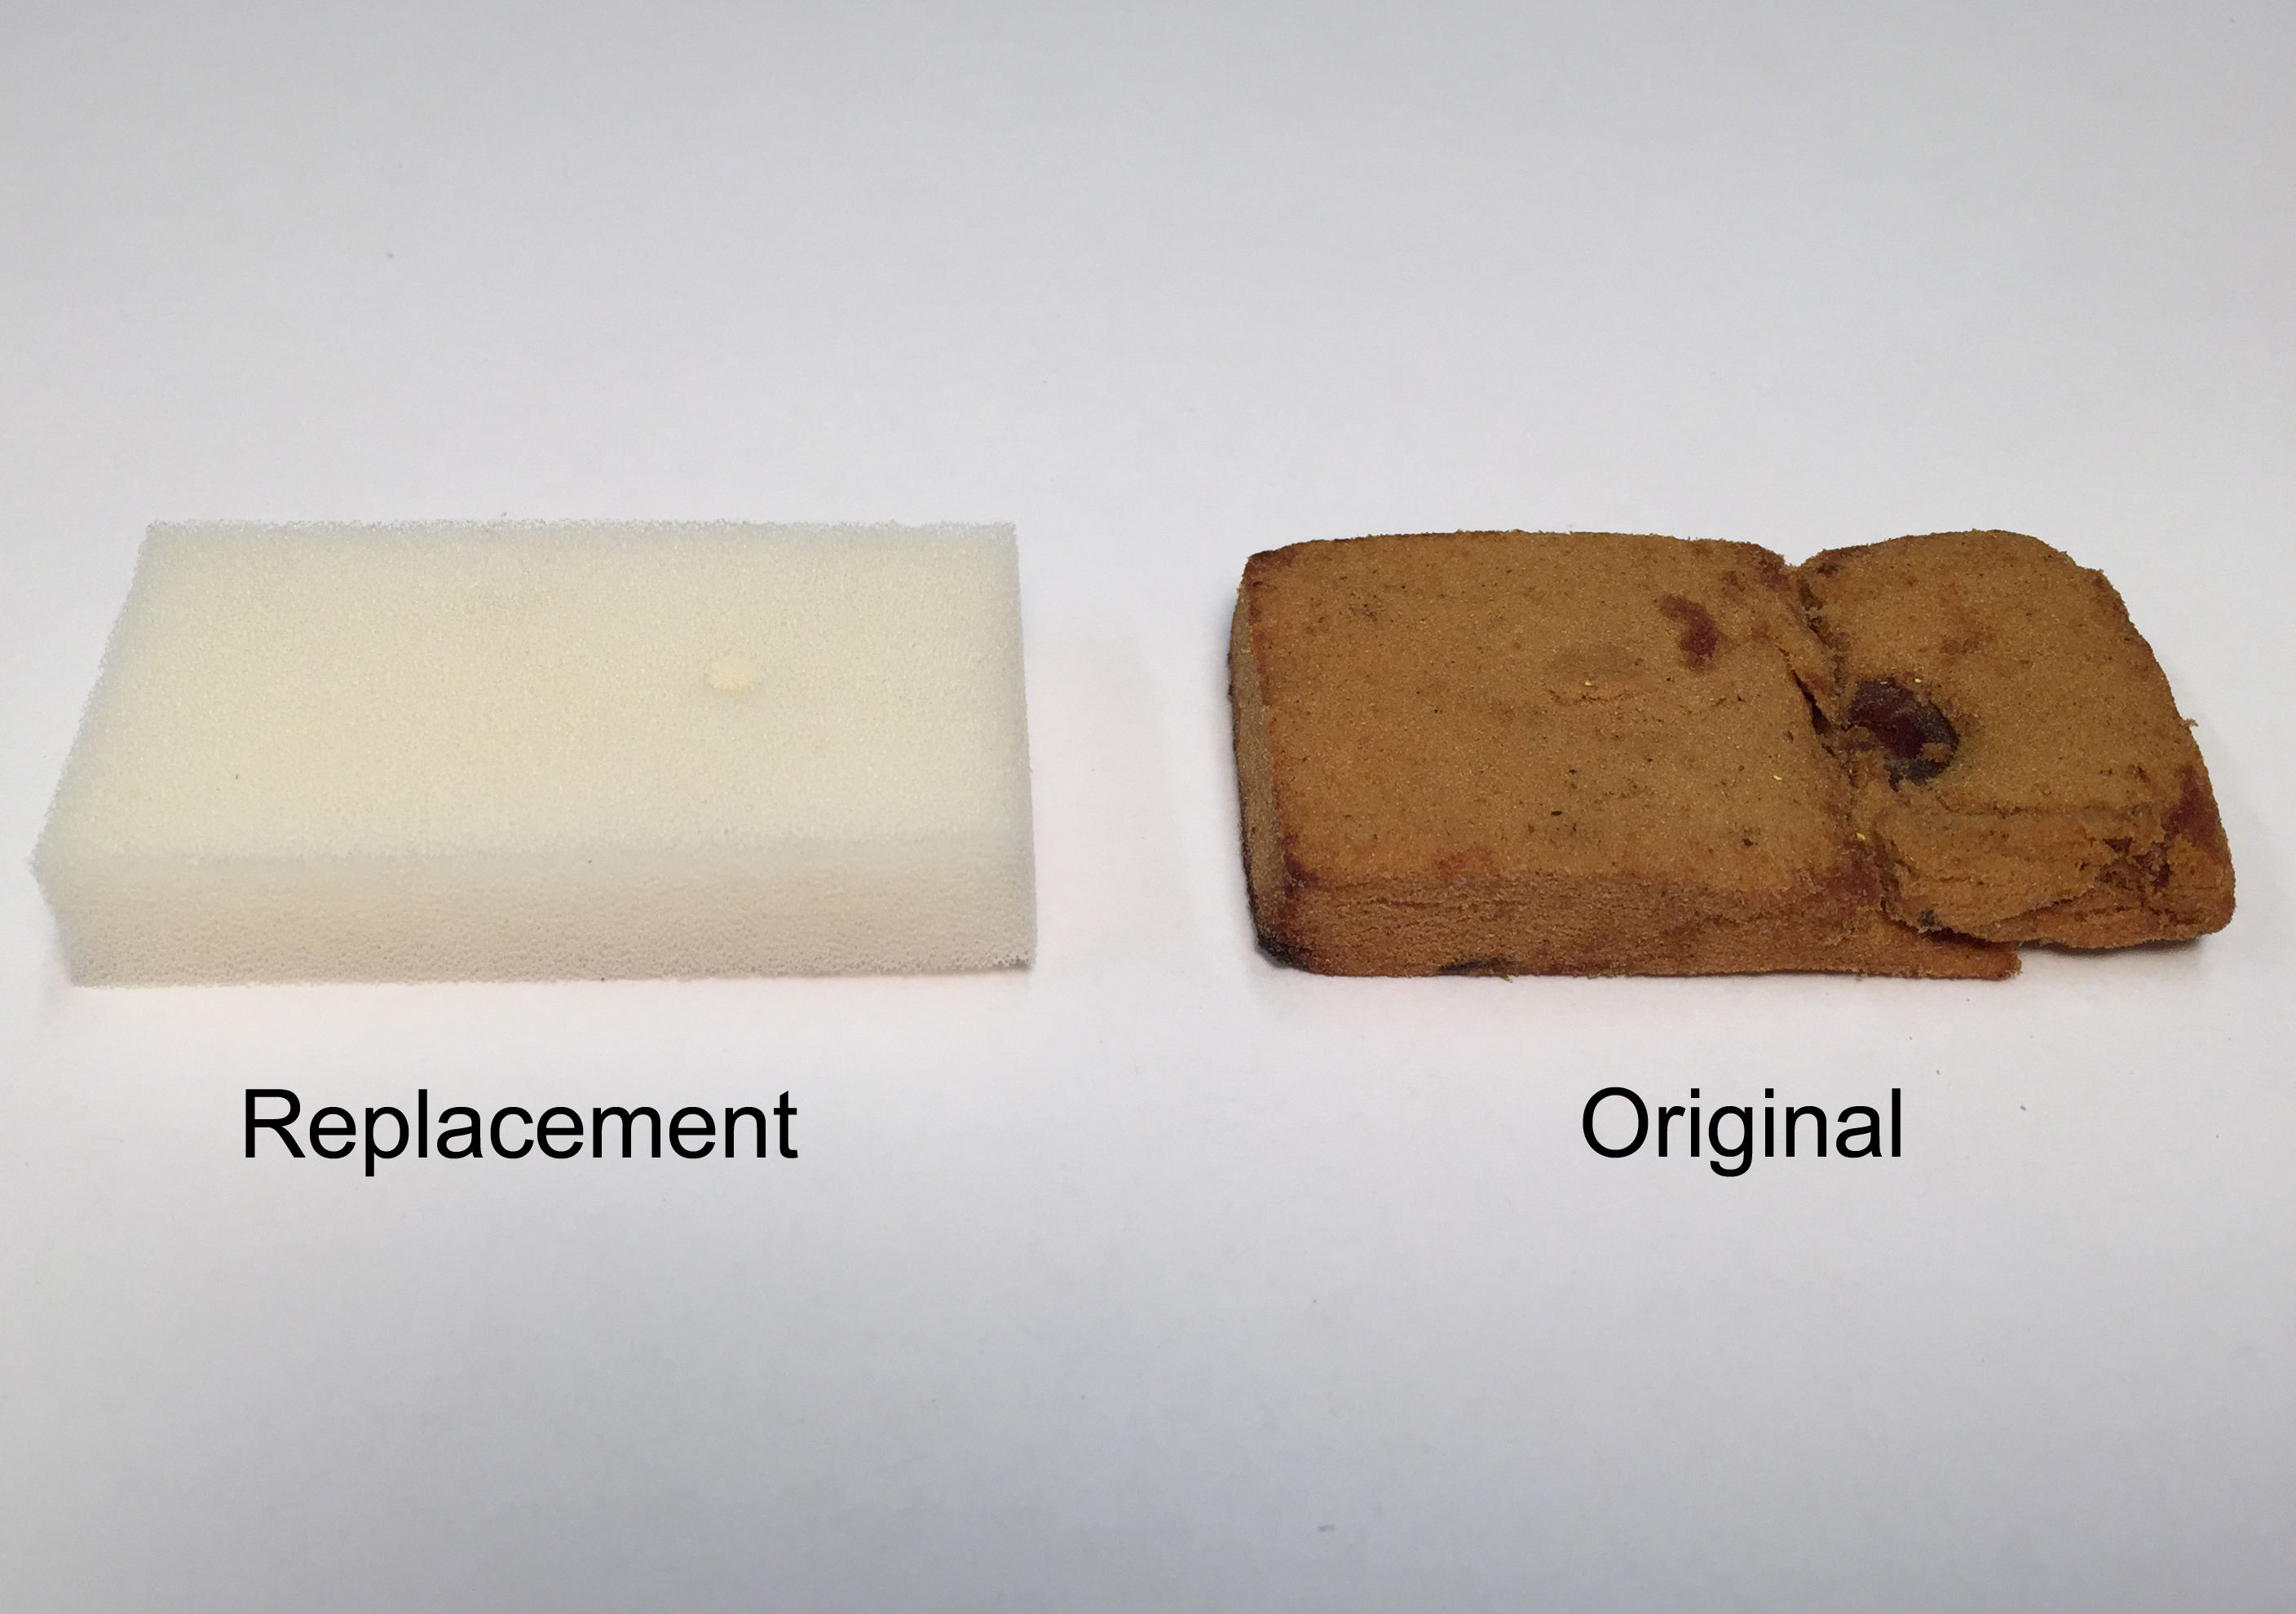
Figure 4: Original and replacement fuel filters
After tracking down replacements for the bad parts, the next step was to actually rebuild the saw. Initially, I wasn’t sure if I should pull the crank-case apart or not, in the end I decided to go for it, just to make sure that everything was clean an in order. To do that, I had to pull the flywheel. Luckily, I was able to use my Harbor Freight bolt puller set to pull it off without too much trouble. The trick was to reuse the crank case bolts that go with the saw since none of the bolts in the puller kit were small enough.

Figure 5: Pulling the flywheel
Once I got the crankcase open, I was very glad that I went to the trouble to do so. Sometime in the past (presumably before I owned the saw) someone had used it without an air filter. I have never seen so much debris in a crankcase before!
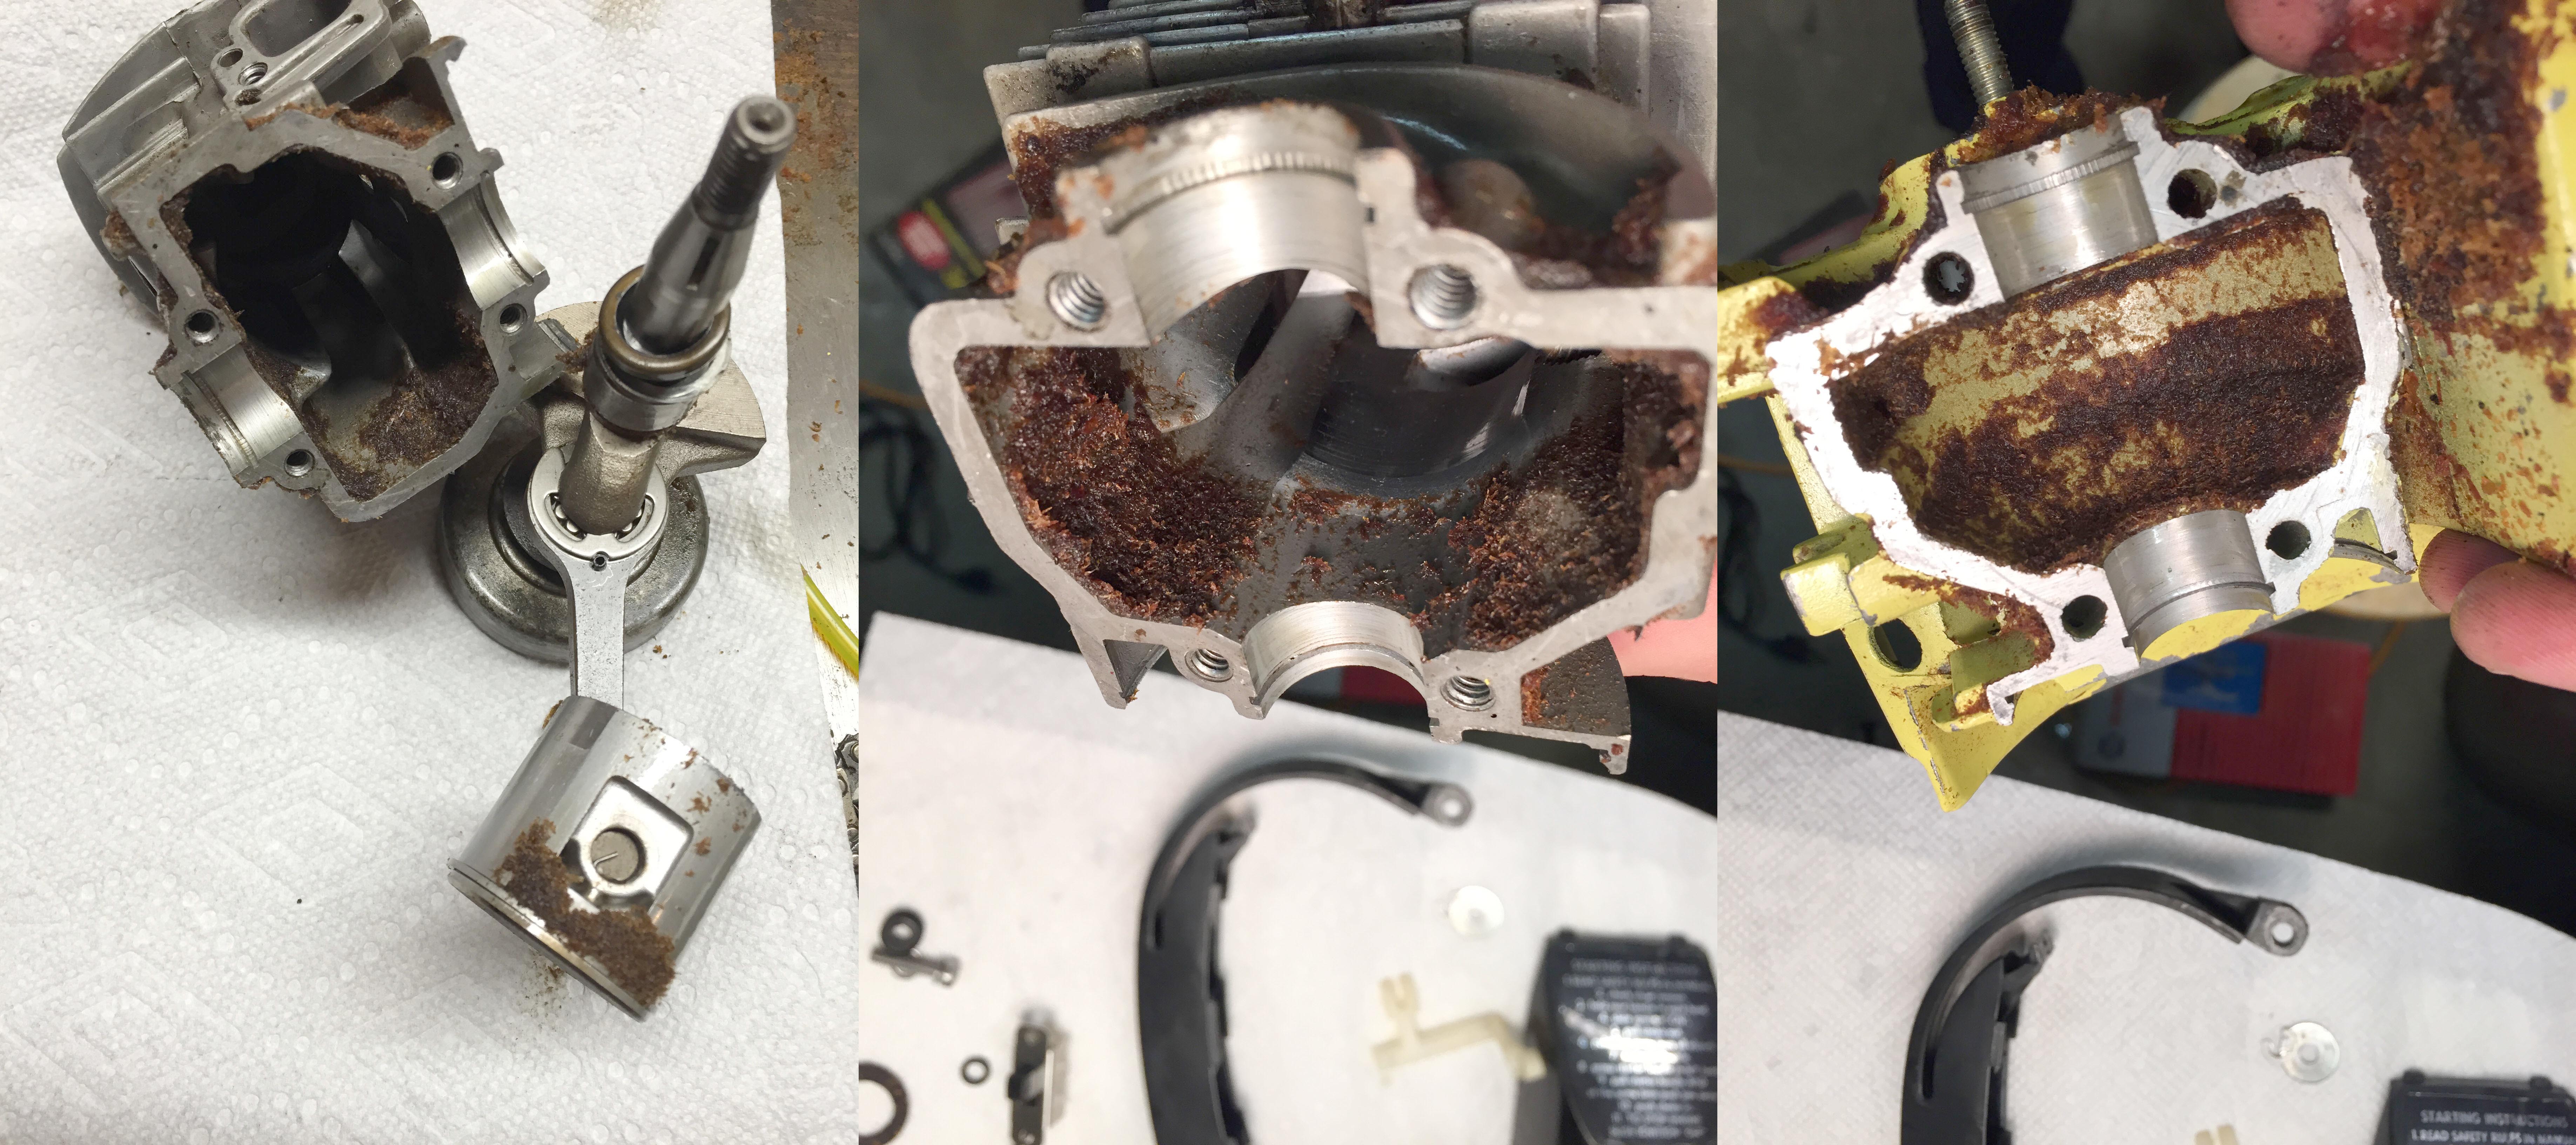
Figure 6: Sawdust in the crankcase. Don’t use a chainsaw without an air filter!
With that much dirt in the saw, I decided it was best to totally tear it down completely and clean all the parts. The disassembly was pretty easy except for removing the clutch assembly from the crank shaft. The problem is that the only way to turn the clutch body is via two small rectangular slots in that are made to fit a special spanner wrench. I didn’t have the correct wench, so I cheated by using a pair of cheap needle nose pliers (don’t use good ones) with one jaw inserted into each hole. I clamped the pliers in a vice (with the vice as near as possible to the jaws for best leverage) and put a wrench on the crank shaft to turn it. Note that it is a reverse thread. The photo below shows the clutch.
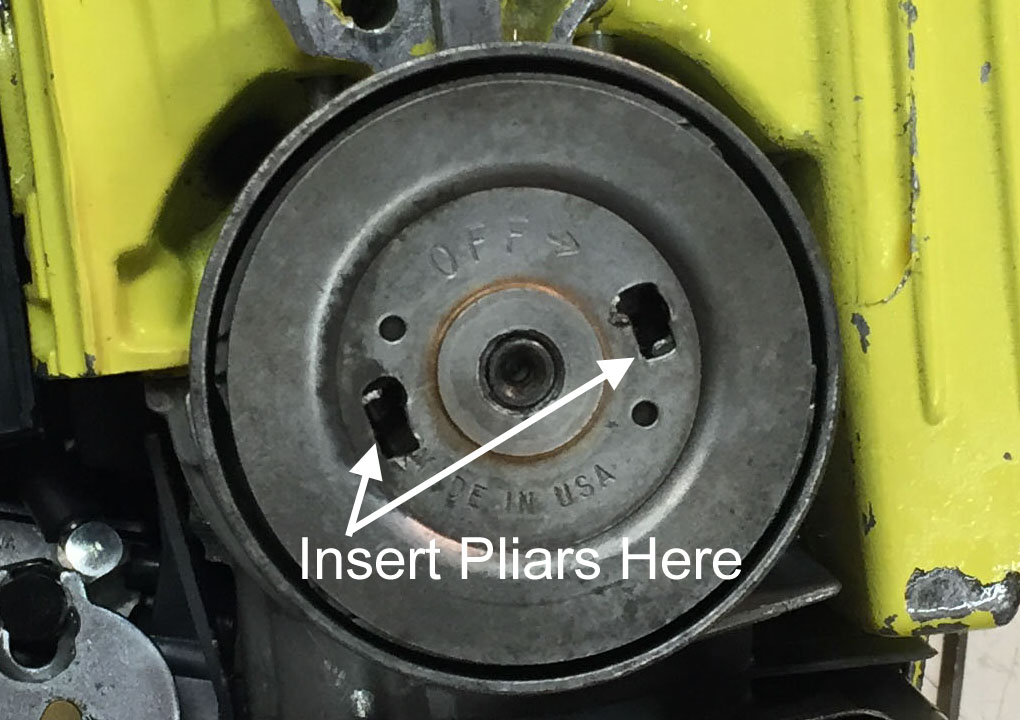
Figure 8: Clutch assembly showing where I inserted needle nose pliers to loosen it.
I washed every piece in detergent and water and allowed them all to dry thoroughly. Here is what a chainsaw looks like in pieces.
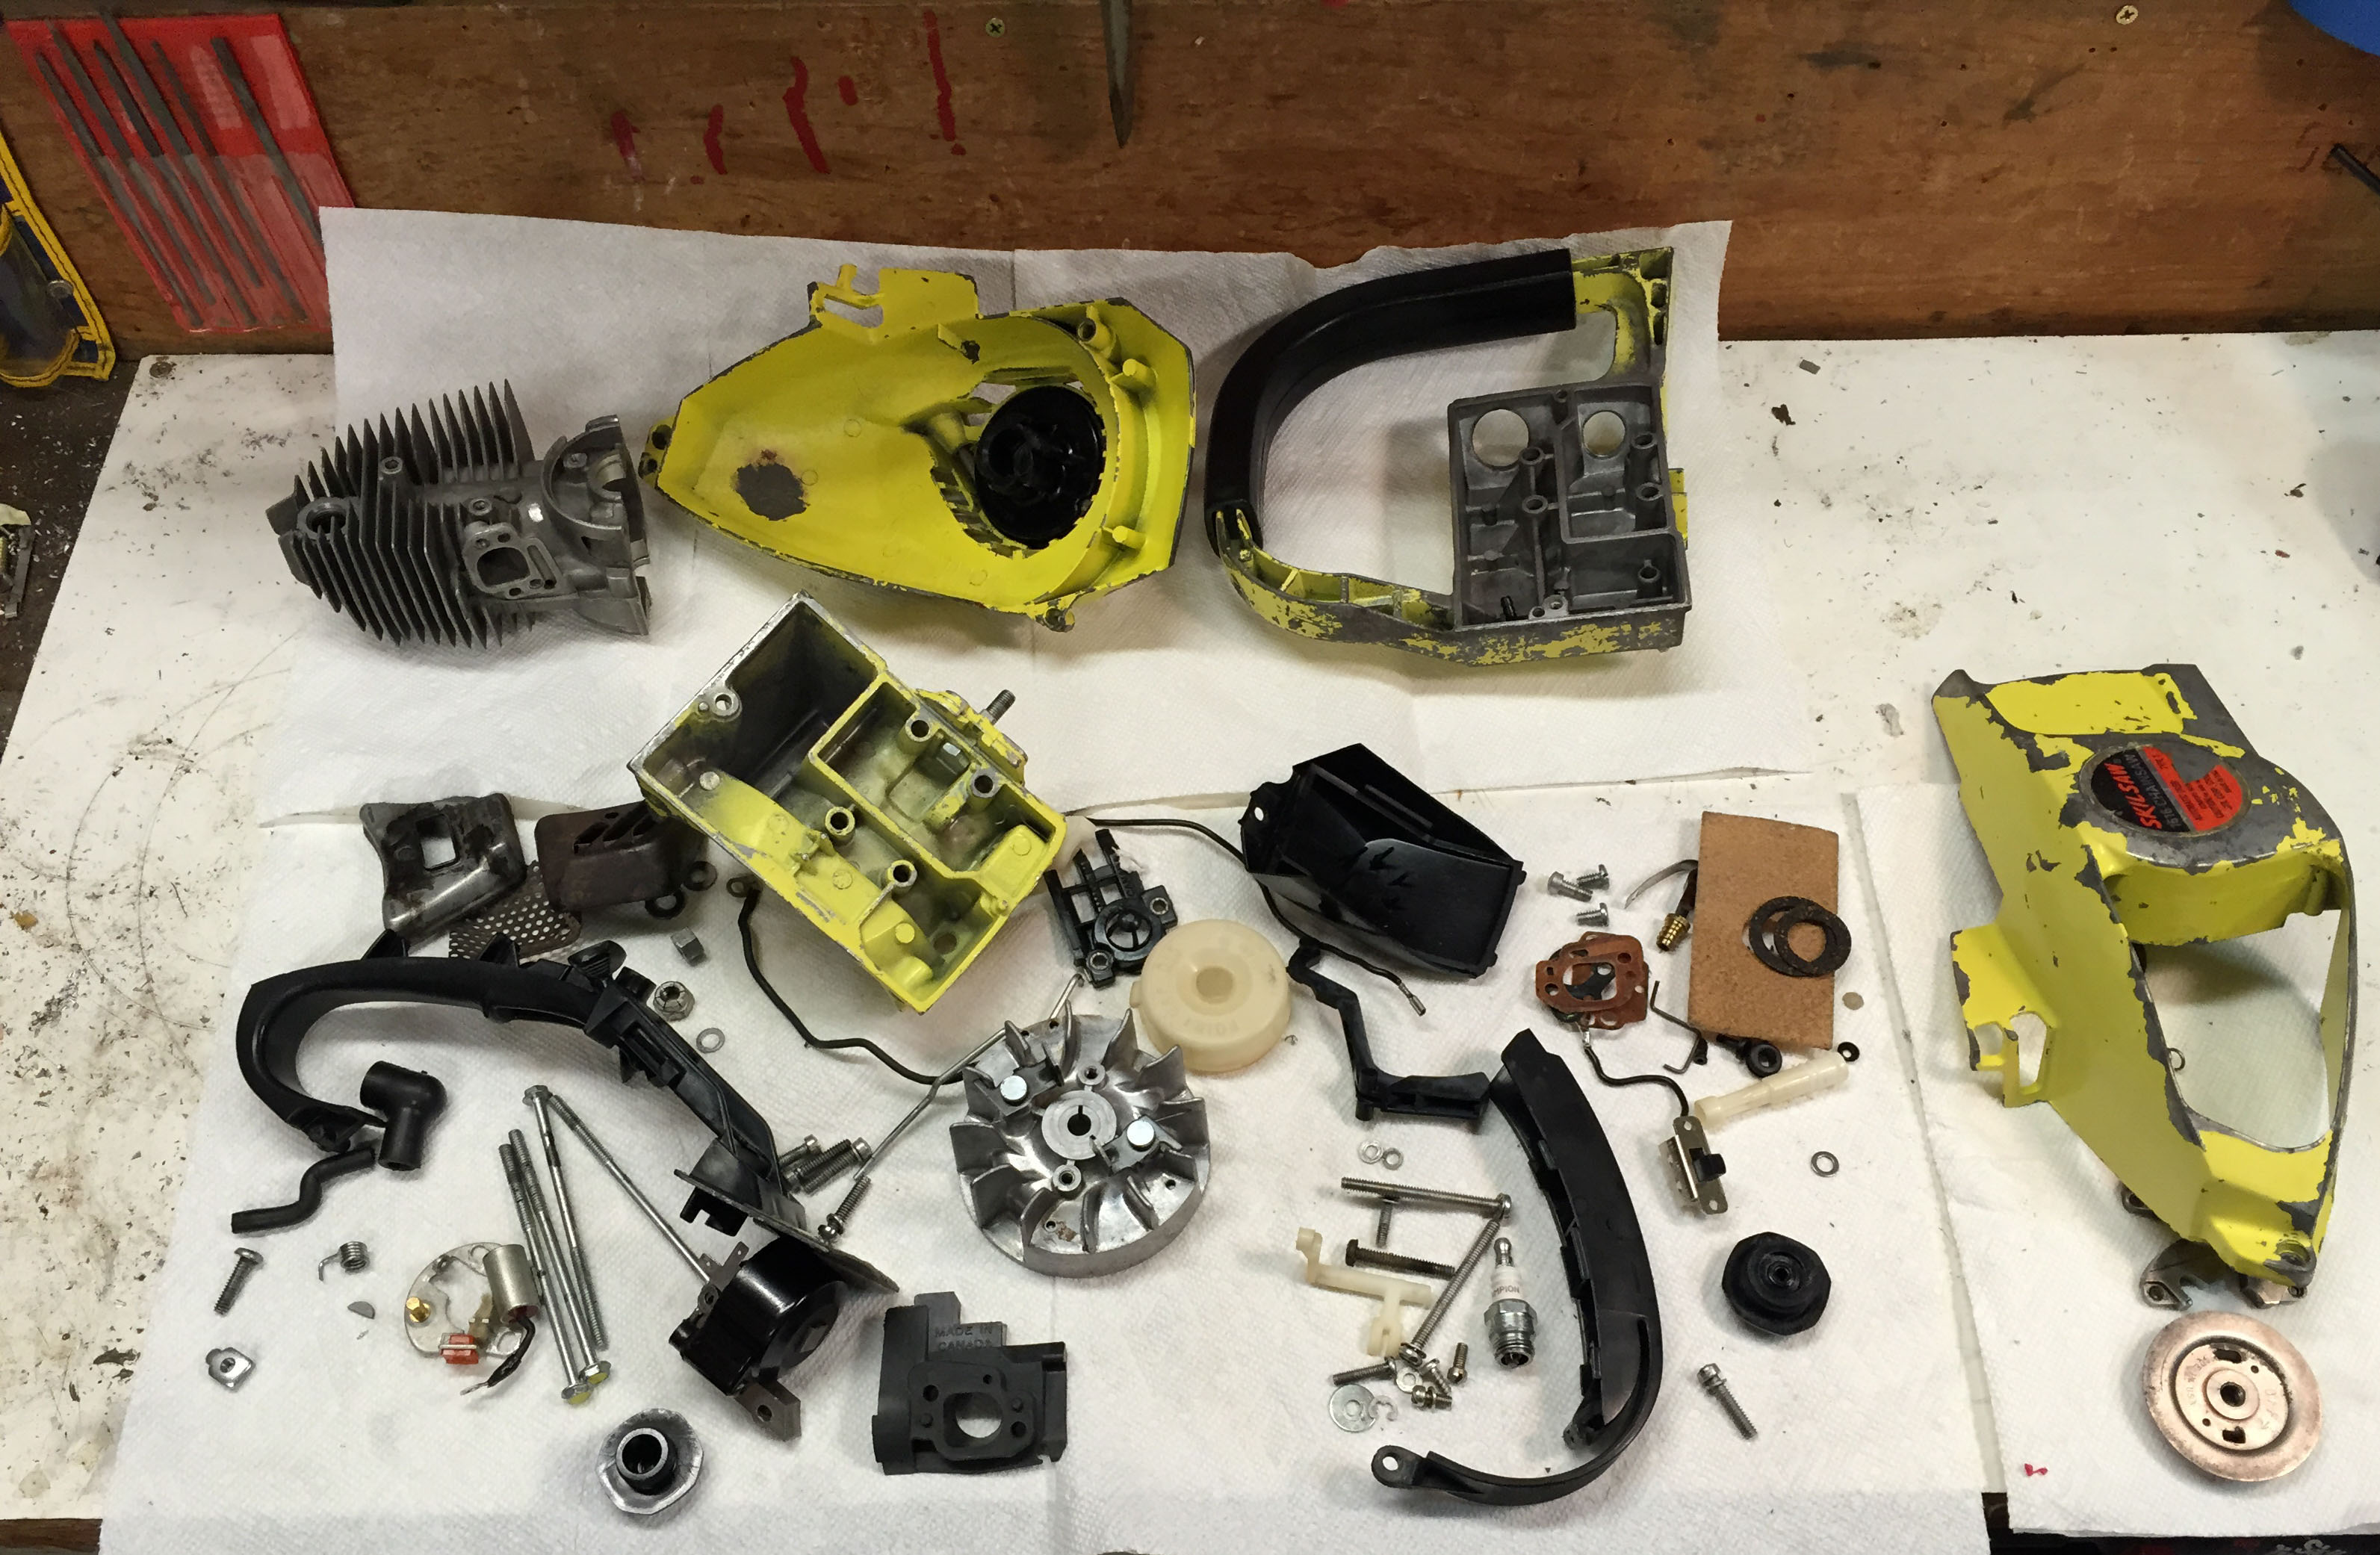
Figure 9: Skil 1616 chainsaw completely disassembled.
The trickiest parts to get cleaned were the piston, crankshaft, and rod since they are assembled with tiny needle bearings and must be put back in the same orientation as they were taken out since that is how they wore together. However, by being careful to take pictures of everything and wash one piece at a time the process went relatively smoothly. Here is what the crank assembly looks like totally disassembled.
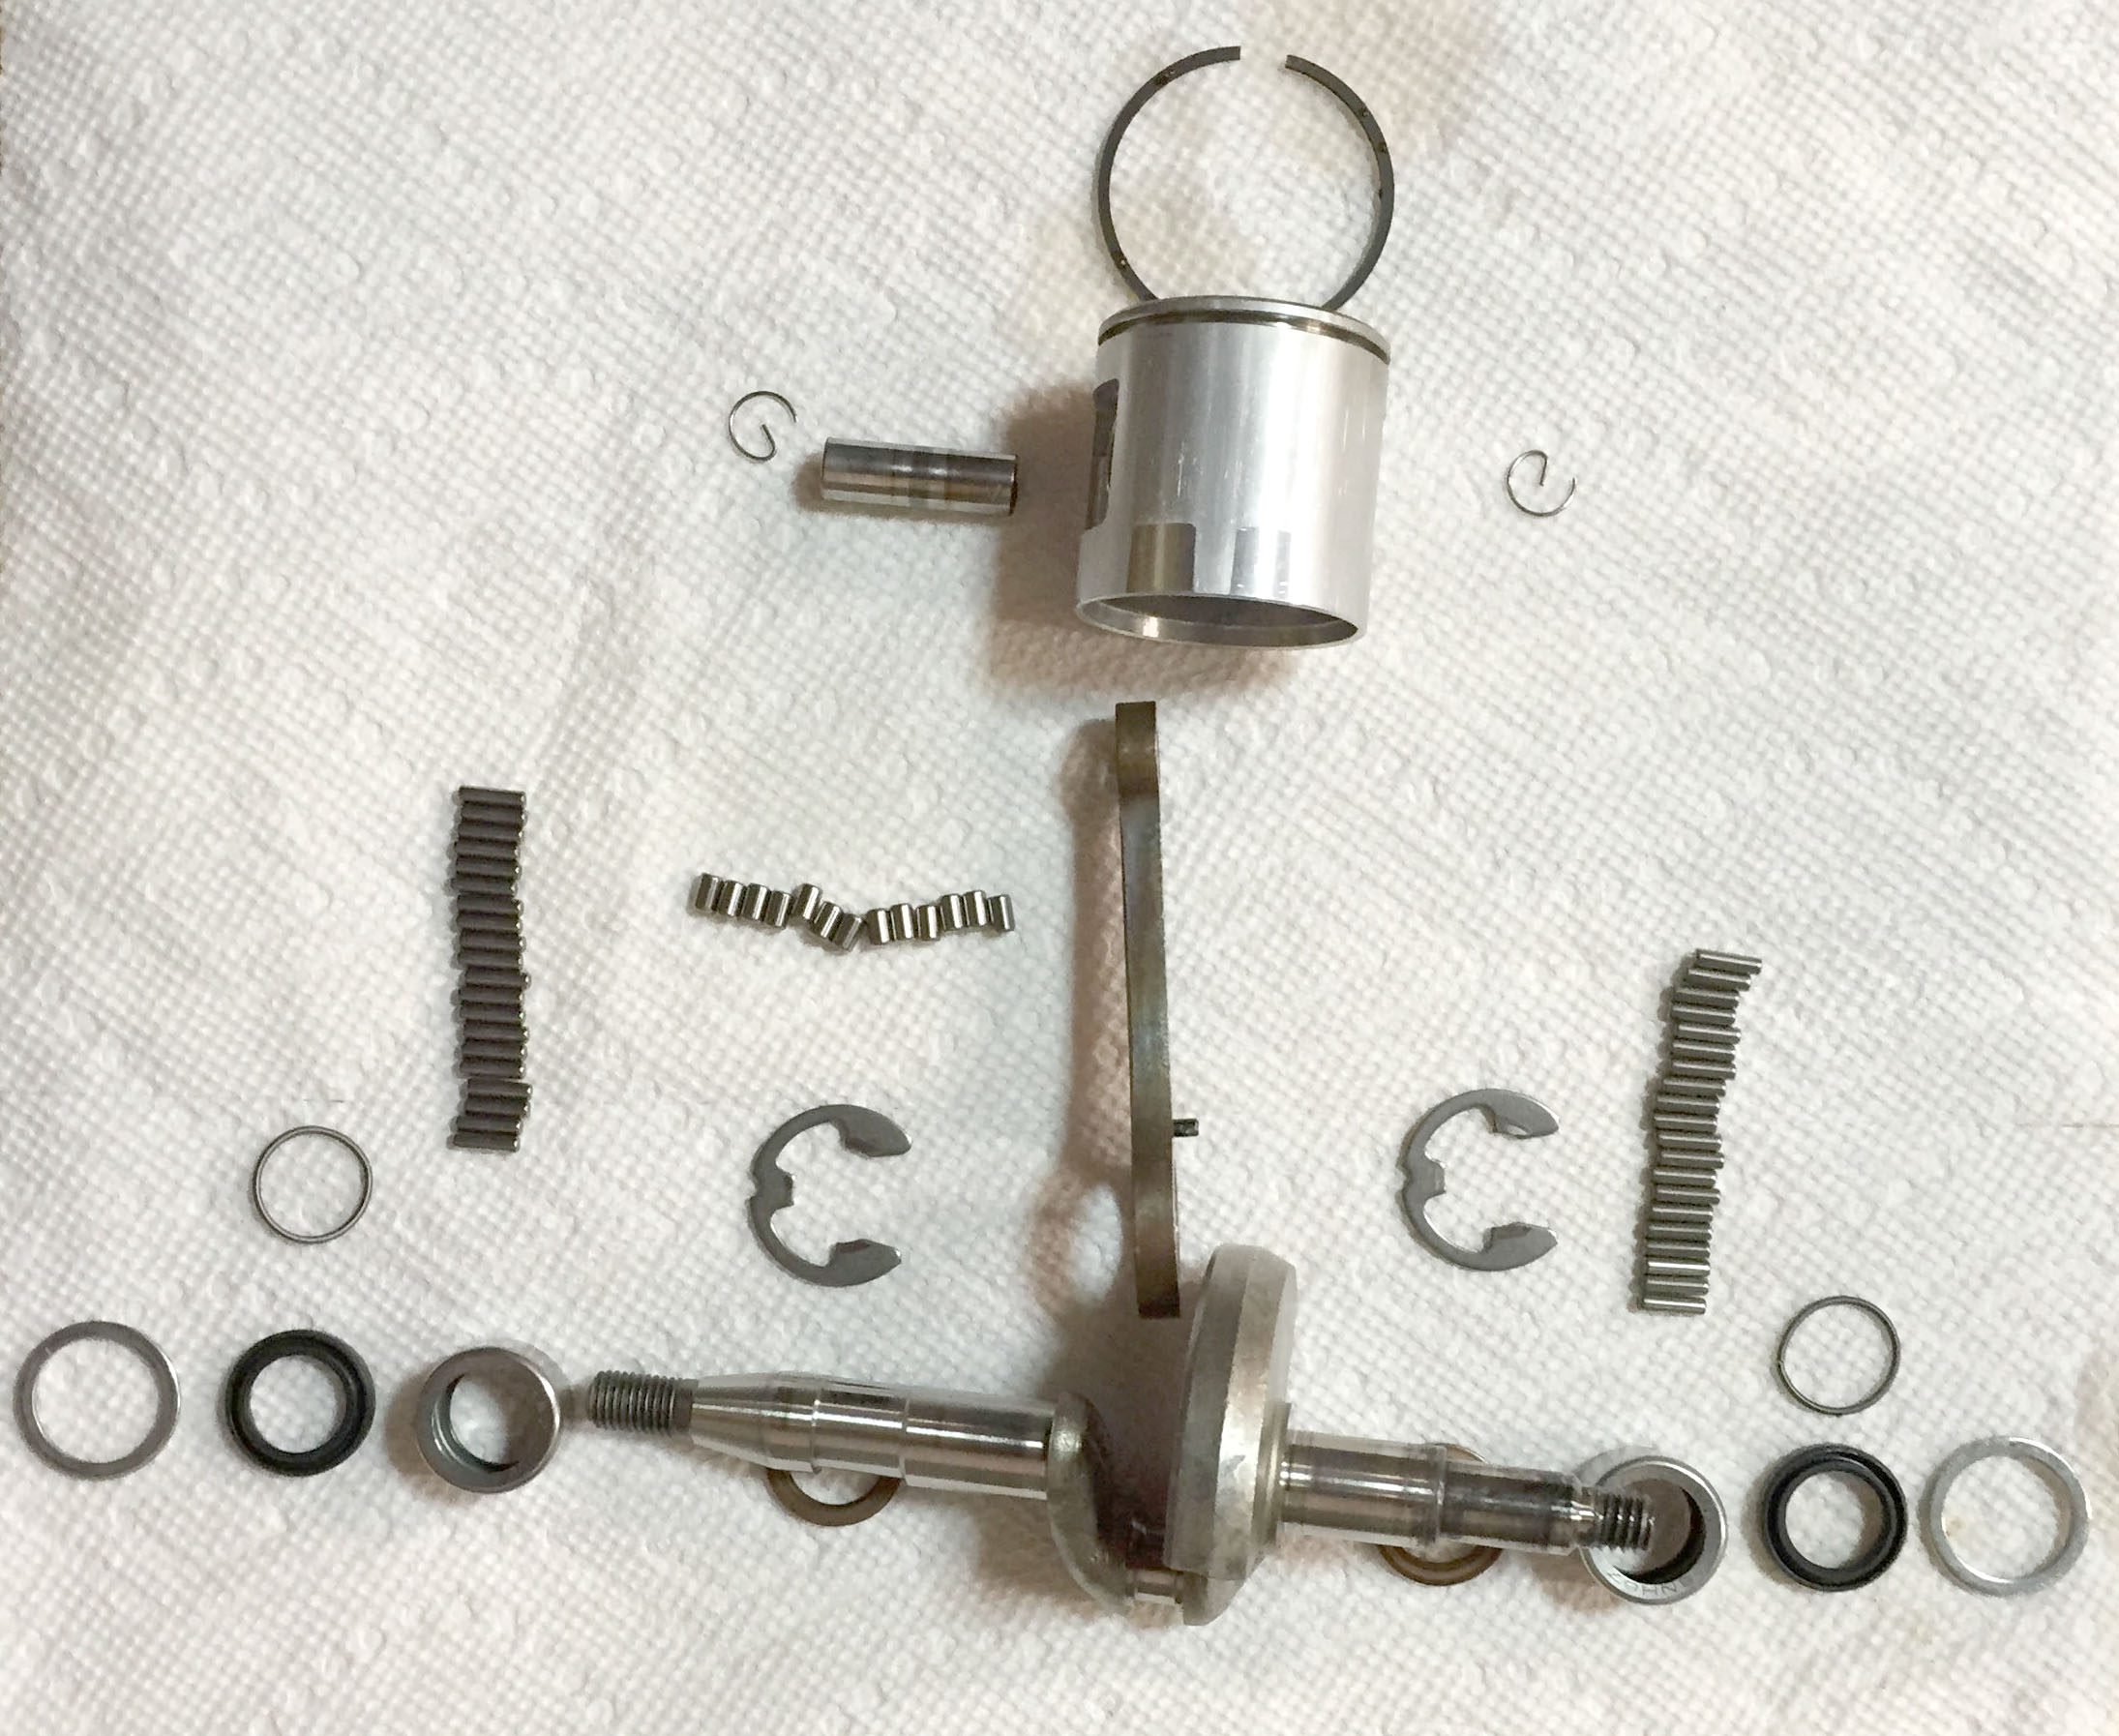
Figure 10: The crank assembly taken down to its constituent parts.
The other part of the saw that provided a bit of a challenge was the carburetor. The high speed circuit contains a small check-valve (called the “Nozzle Check Value” in the Walbro WA series service manual) which is pressed into the body of the carburetor. The rest of the carburetor was so contaminated with old dried gasoline that I really wanted to be able to take apart this valve to be able to clean it out. Getting it out of the body, however, took a bit of creativity. The trick was to make a small custom tool using my Sherline lathe. The tool consists of a brass rod with a hollow end that exactly fits over the top of the valve. Using this tool I could rock the valve back and forth with enough force to break it loose and pull it out. To put it back in, I used the same tool to hold the valve body so I could press it in with a small hammer. See the photo below.
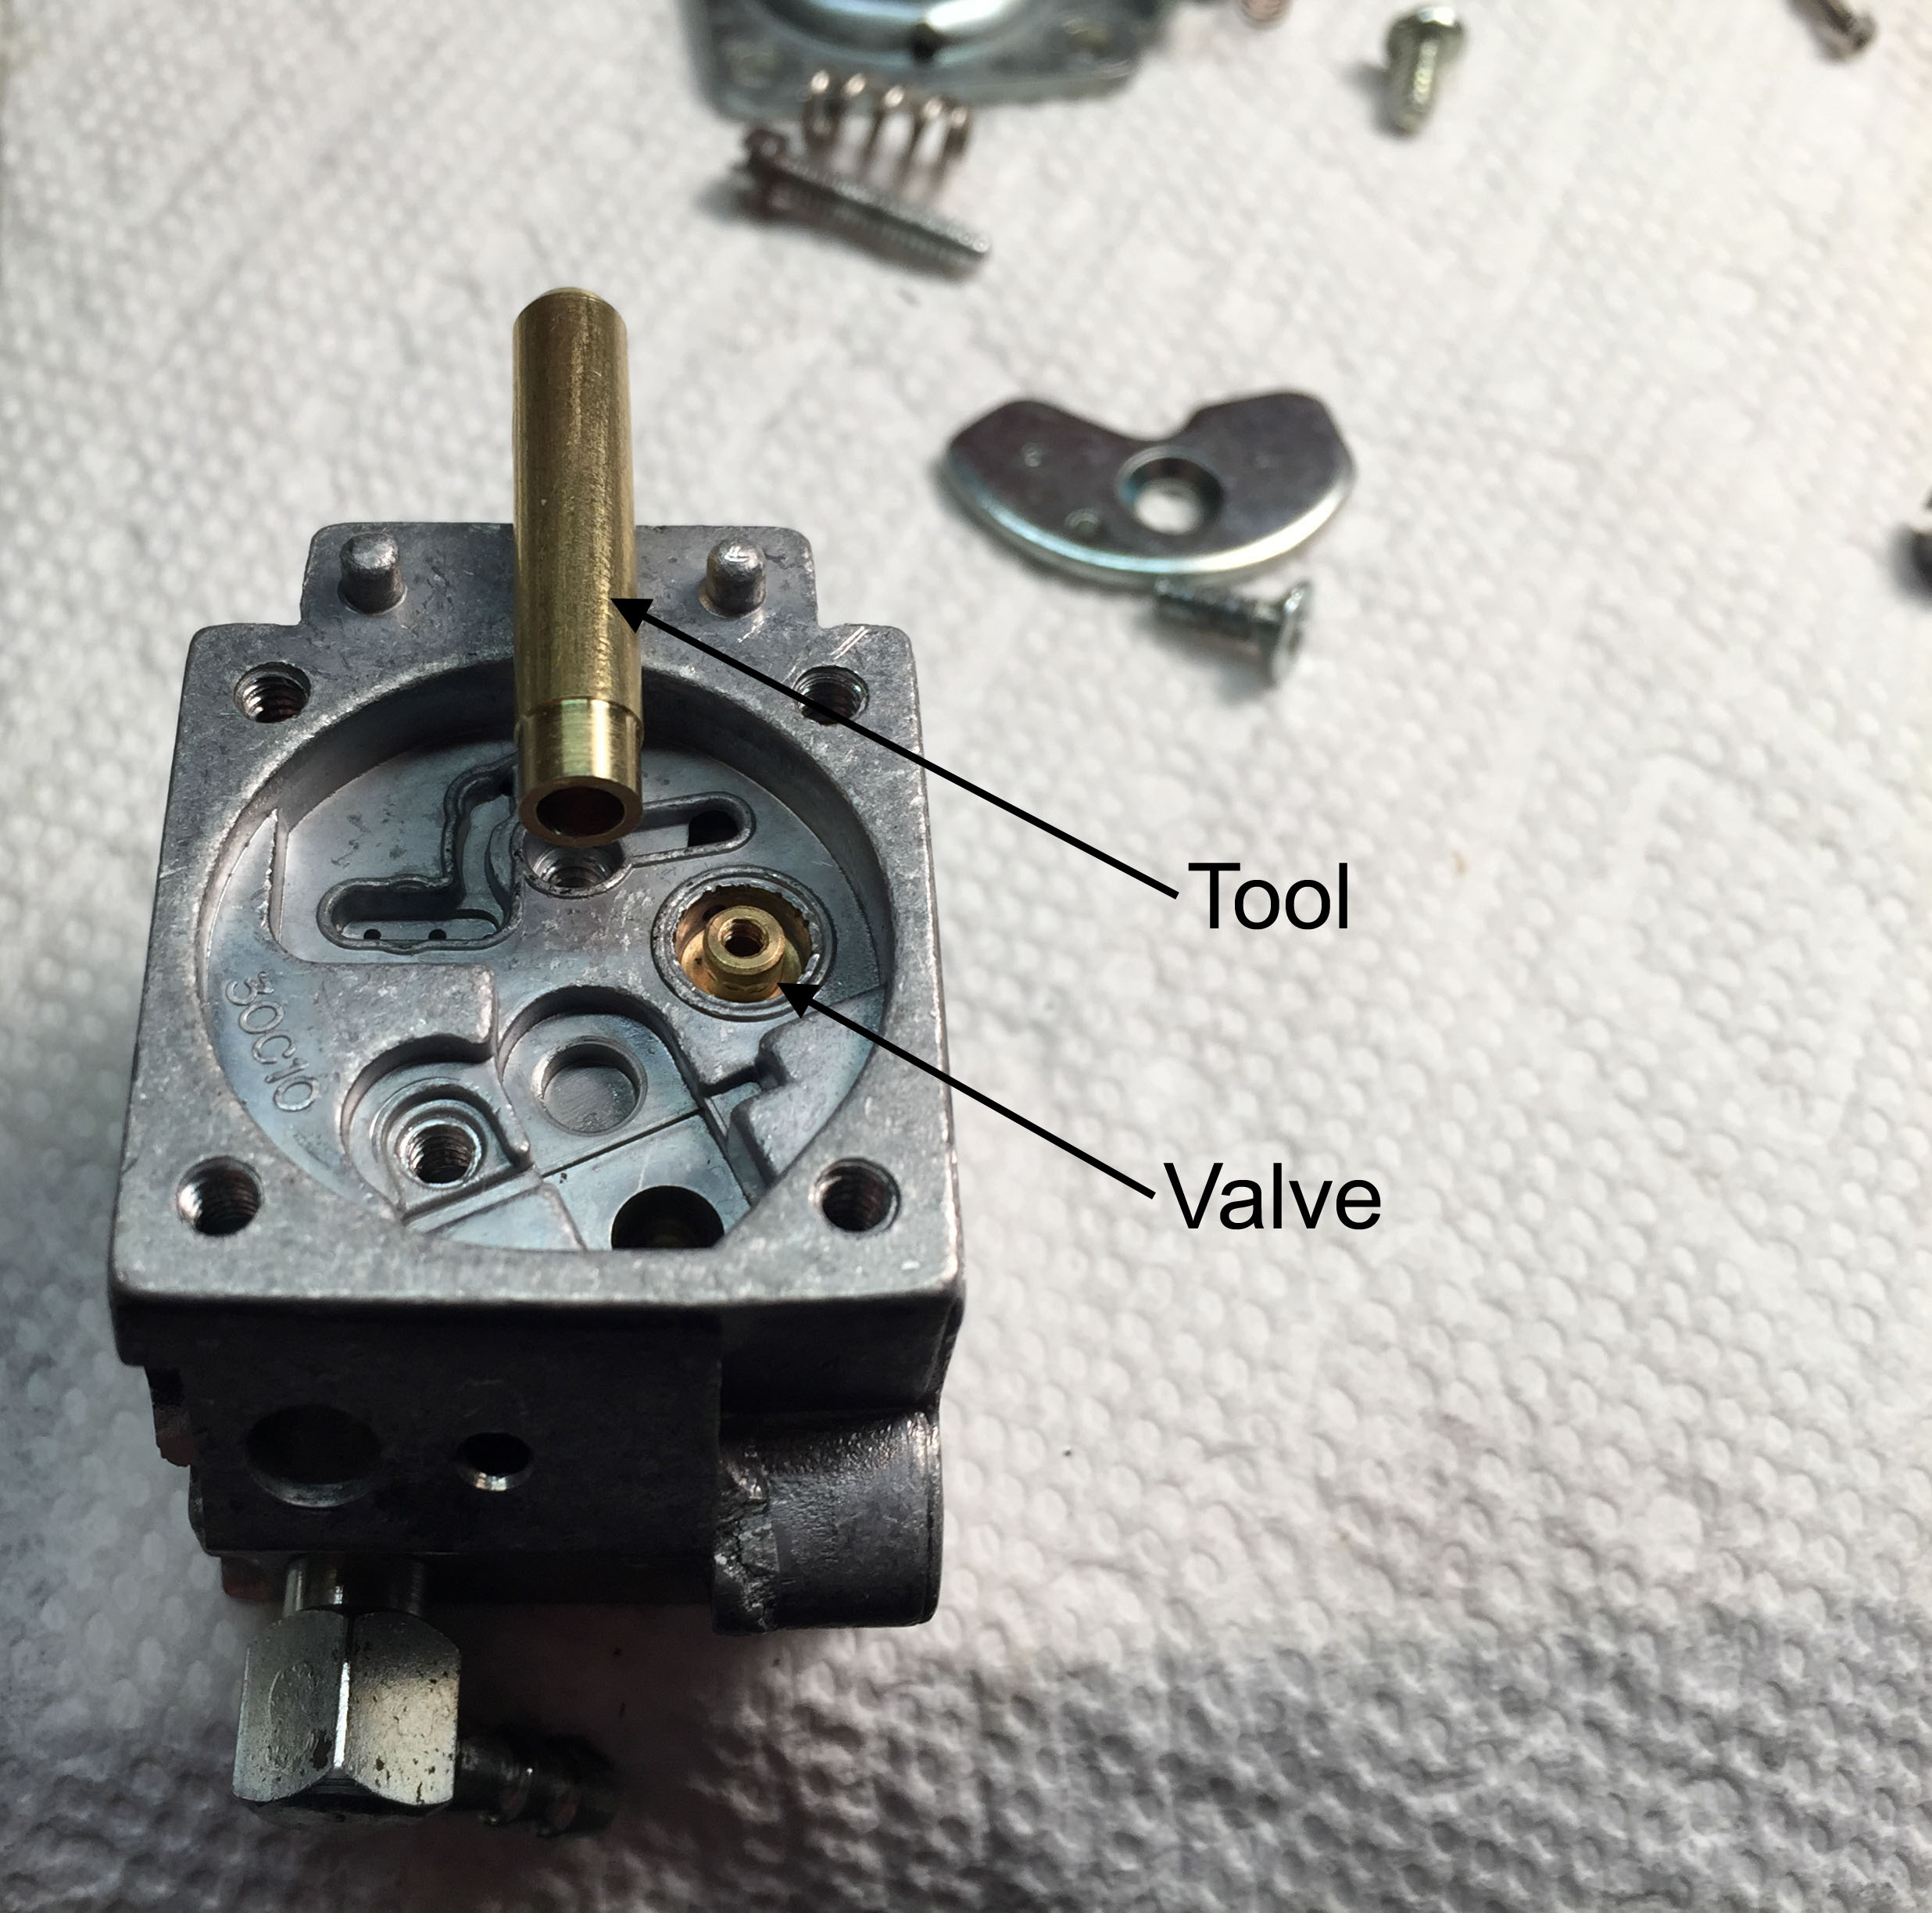
Figure 11: Pressed in carburetor valve and the tool I used to remove it
Once I had the valve out, I discovered that it was made using a small circle of the same material used to make some carburetor fuel pump diaphragms. Unfortunately, this part was warped and damaged and needed to be replaced. Luckily however, one of the spare diaphragms that came in the rebuild kit but which was not needed for my model of carburetor was almost the same material. The only difference was that the original was 0.0055″ thick and the diaphragm in the kit was only 0.003″ thick. I could have ordered the exact material from Route 21 Trading Company, but the thickness difference didn’t seem to matter and the replacement worked fine. I cut the circle of material using a small punch I also made on my lathe. The photo below shows the new and old parts and the punch I used to make the new one.
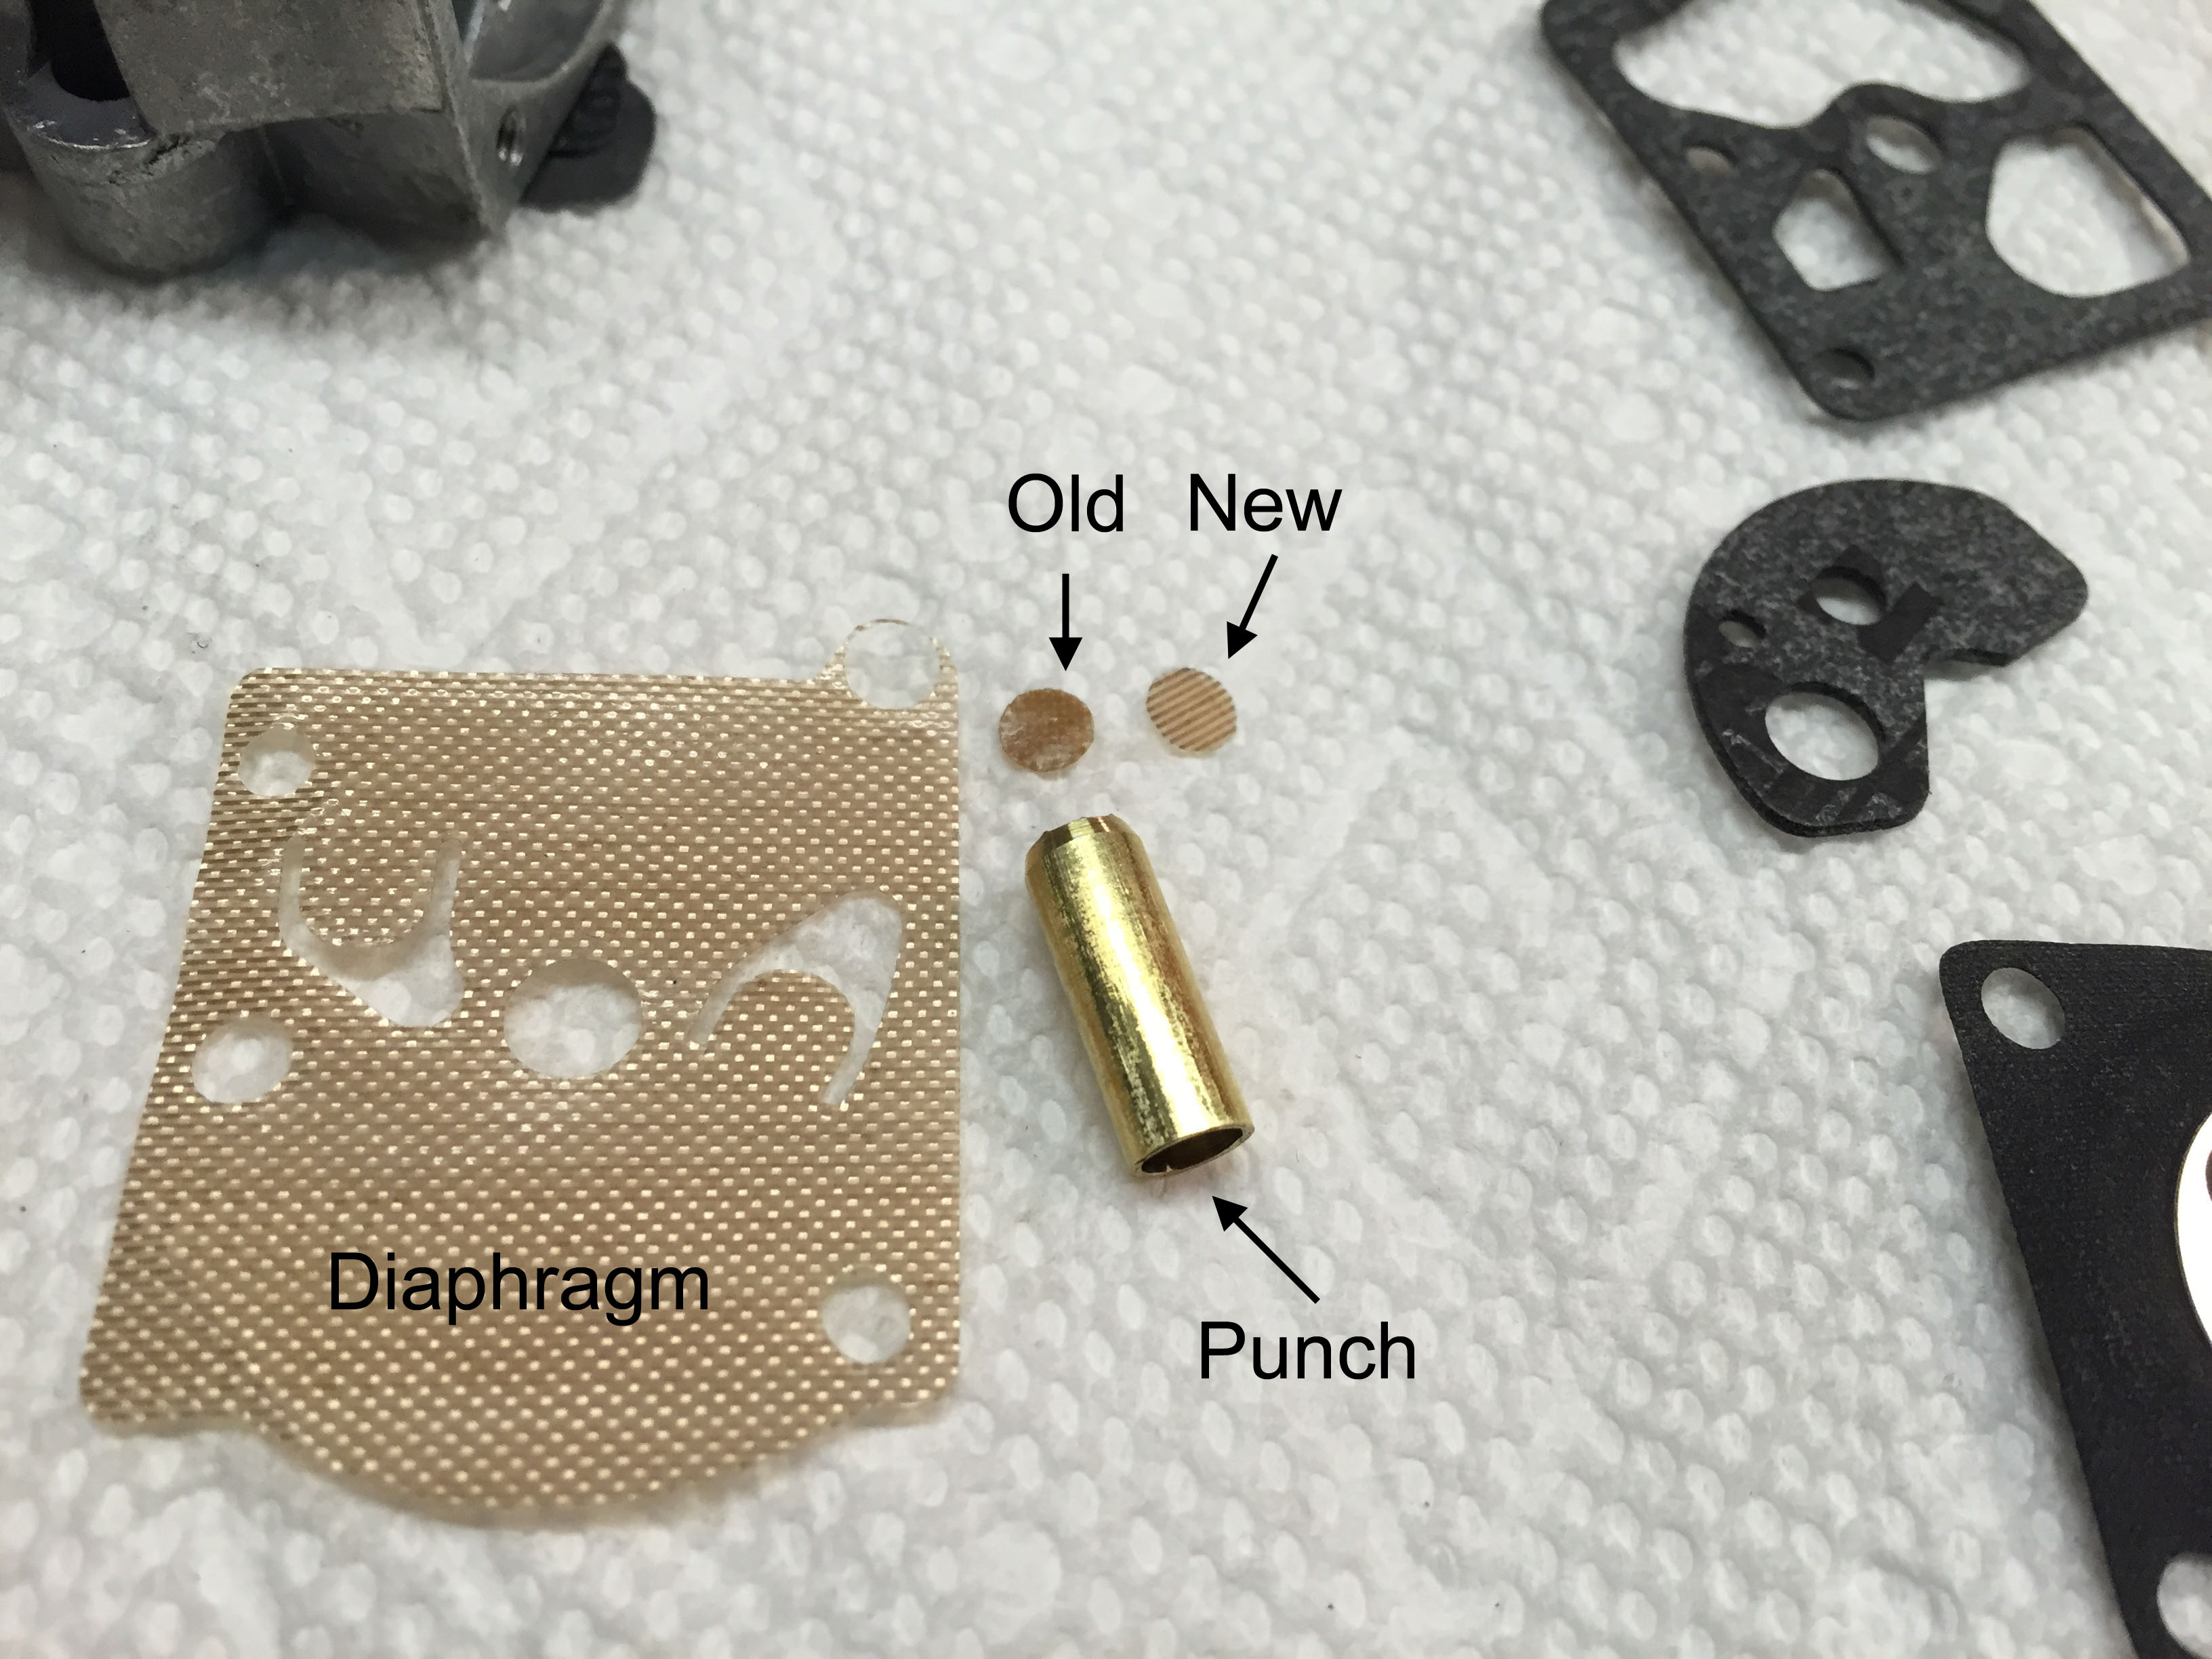
Figure 12: Punching a new carburetor valve
With all the sub-assemblies cleaned and rebuilt, I could finally reassemble the whole saw. After all of the other work, this went relatively quickly. A few pictures document the process.
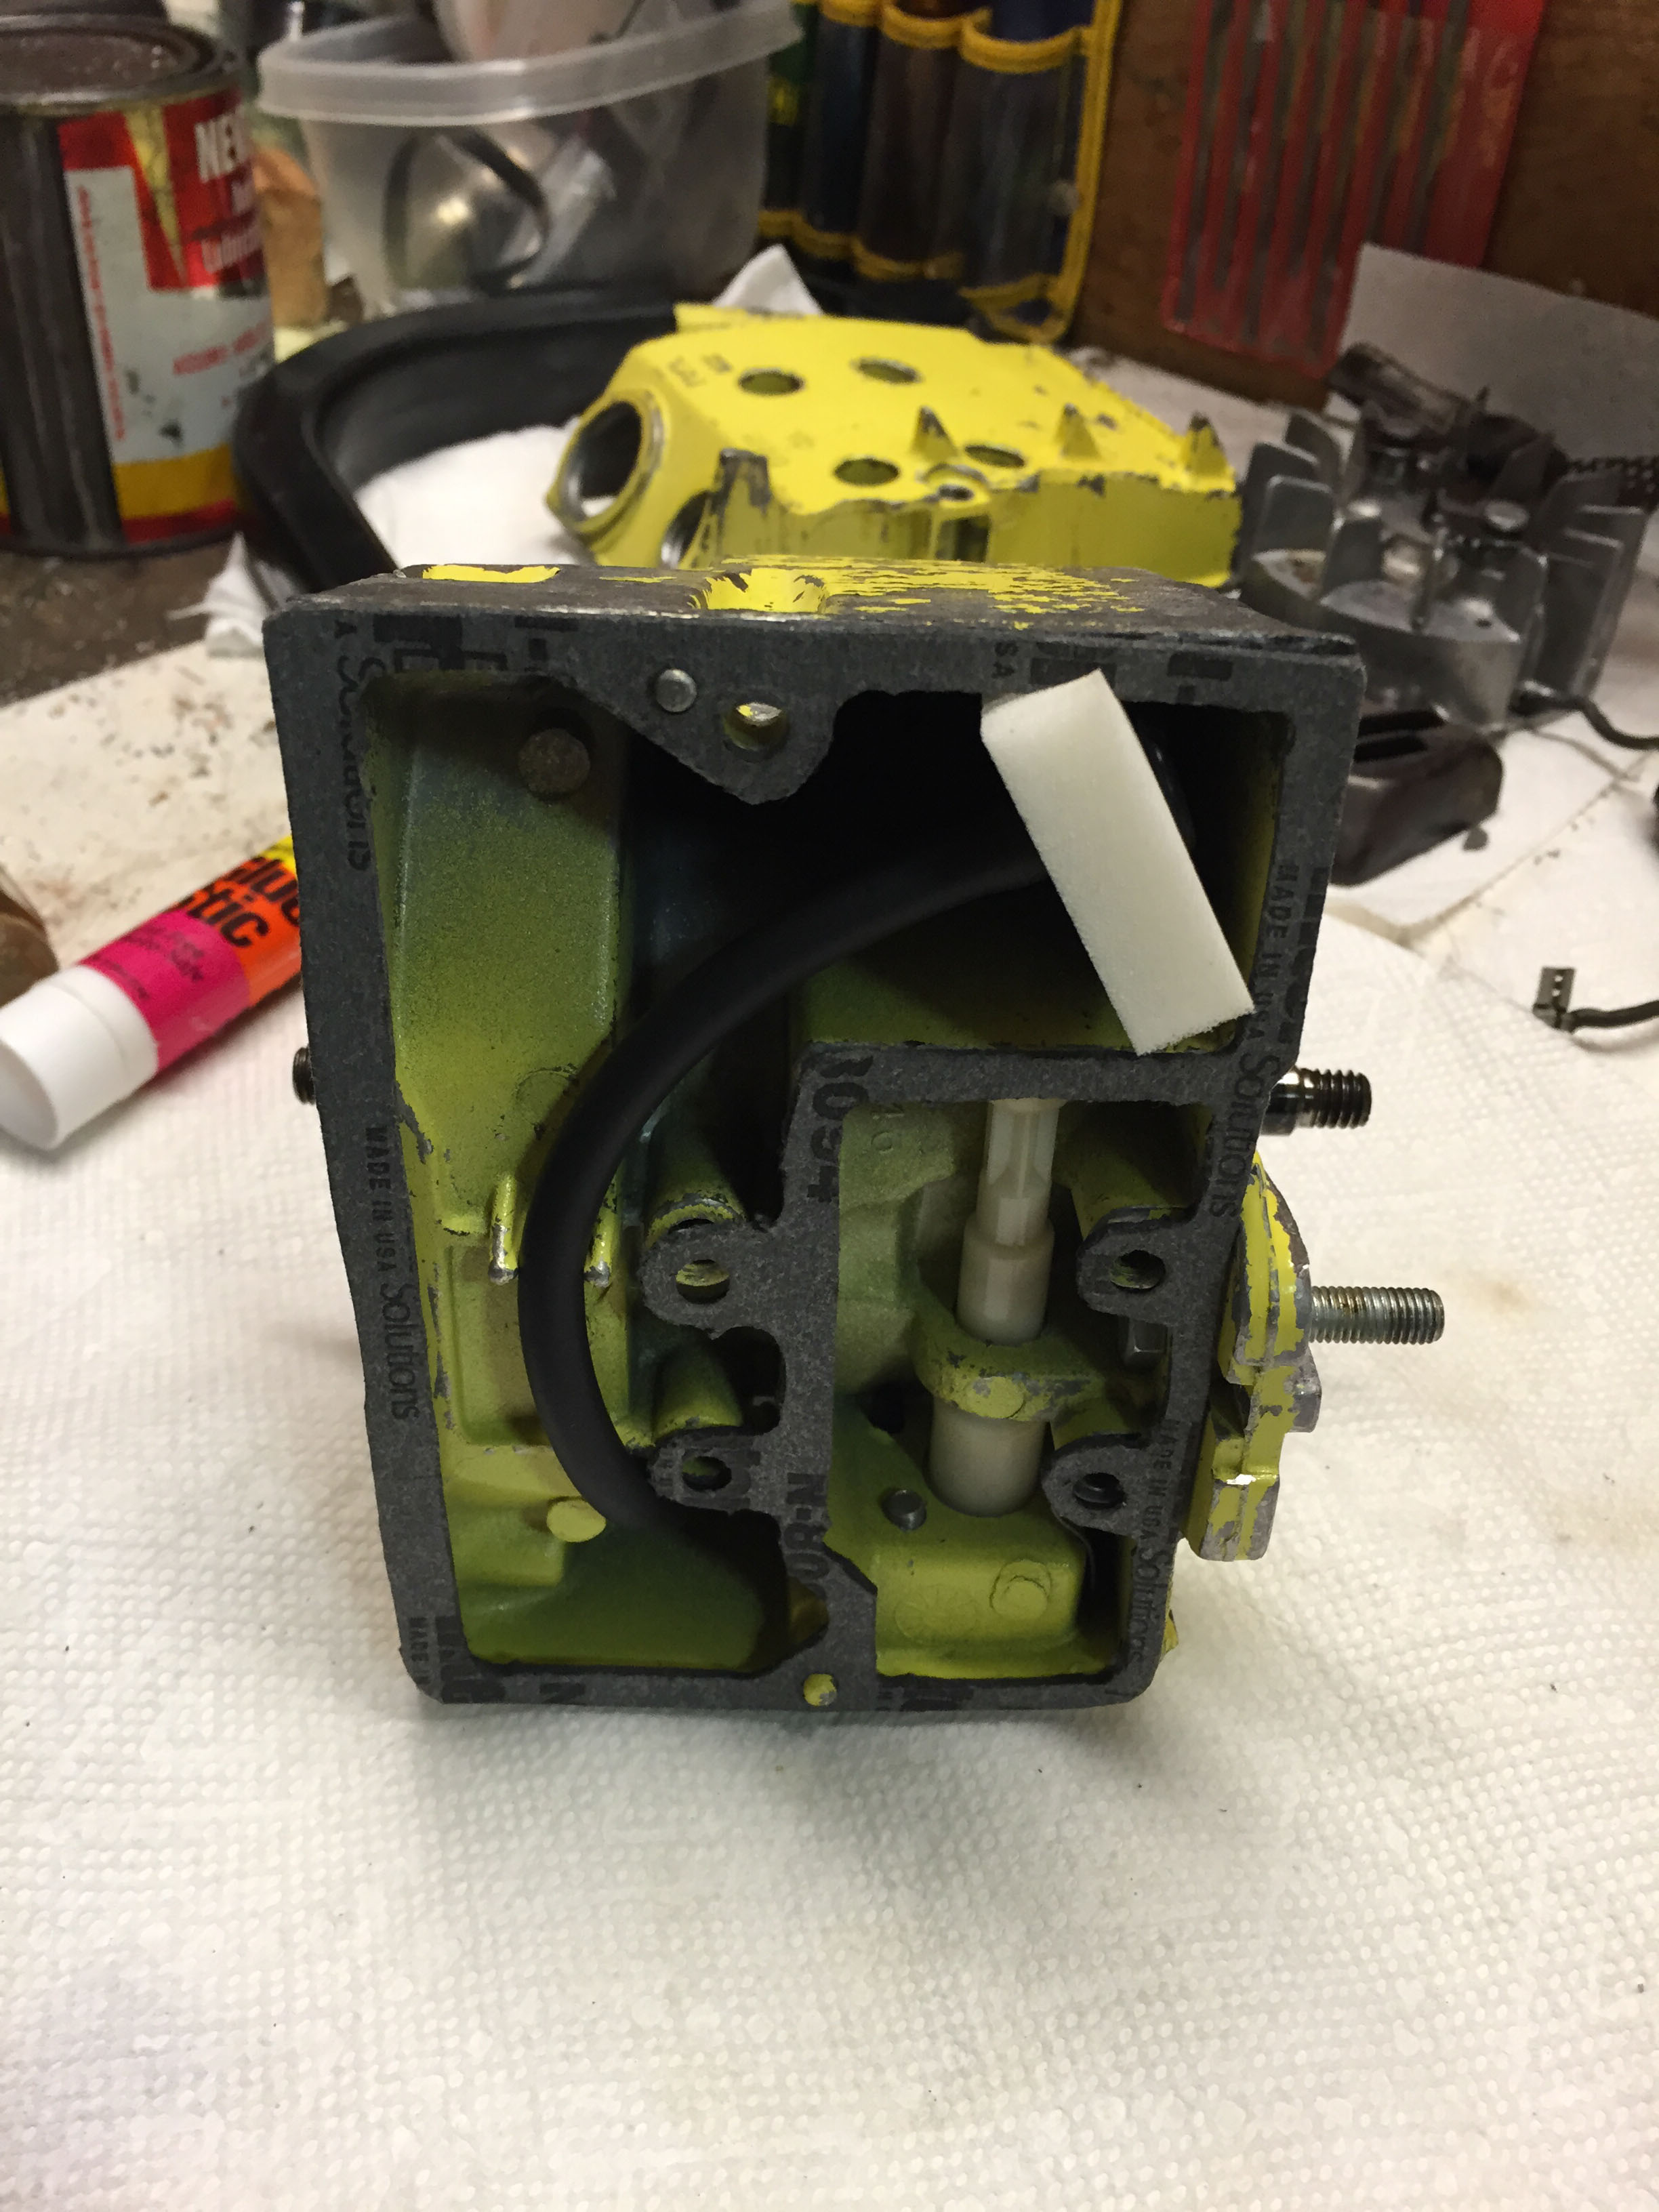
Figure 13: Installing the fuel hose, tank gasket, and fuel filter
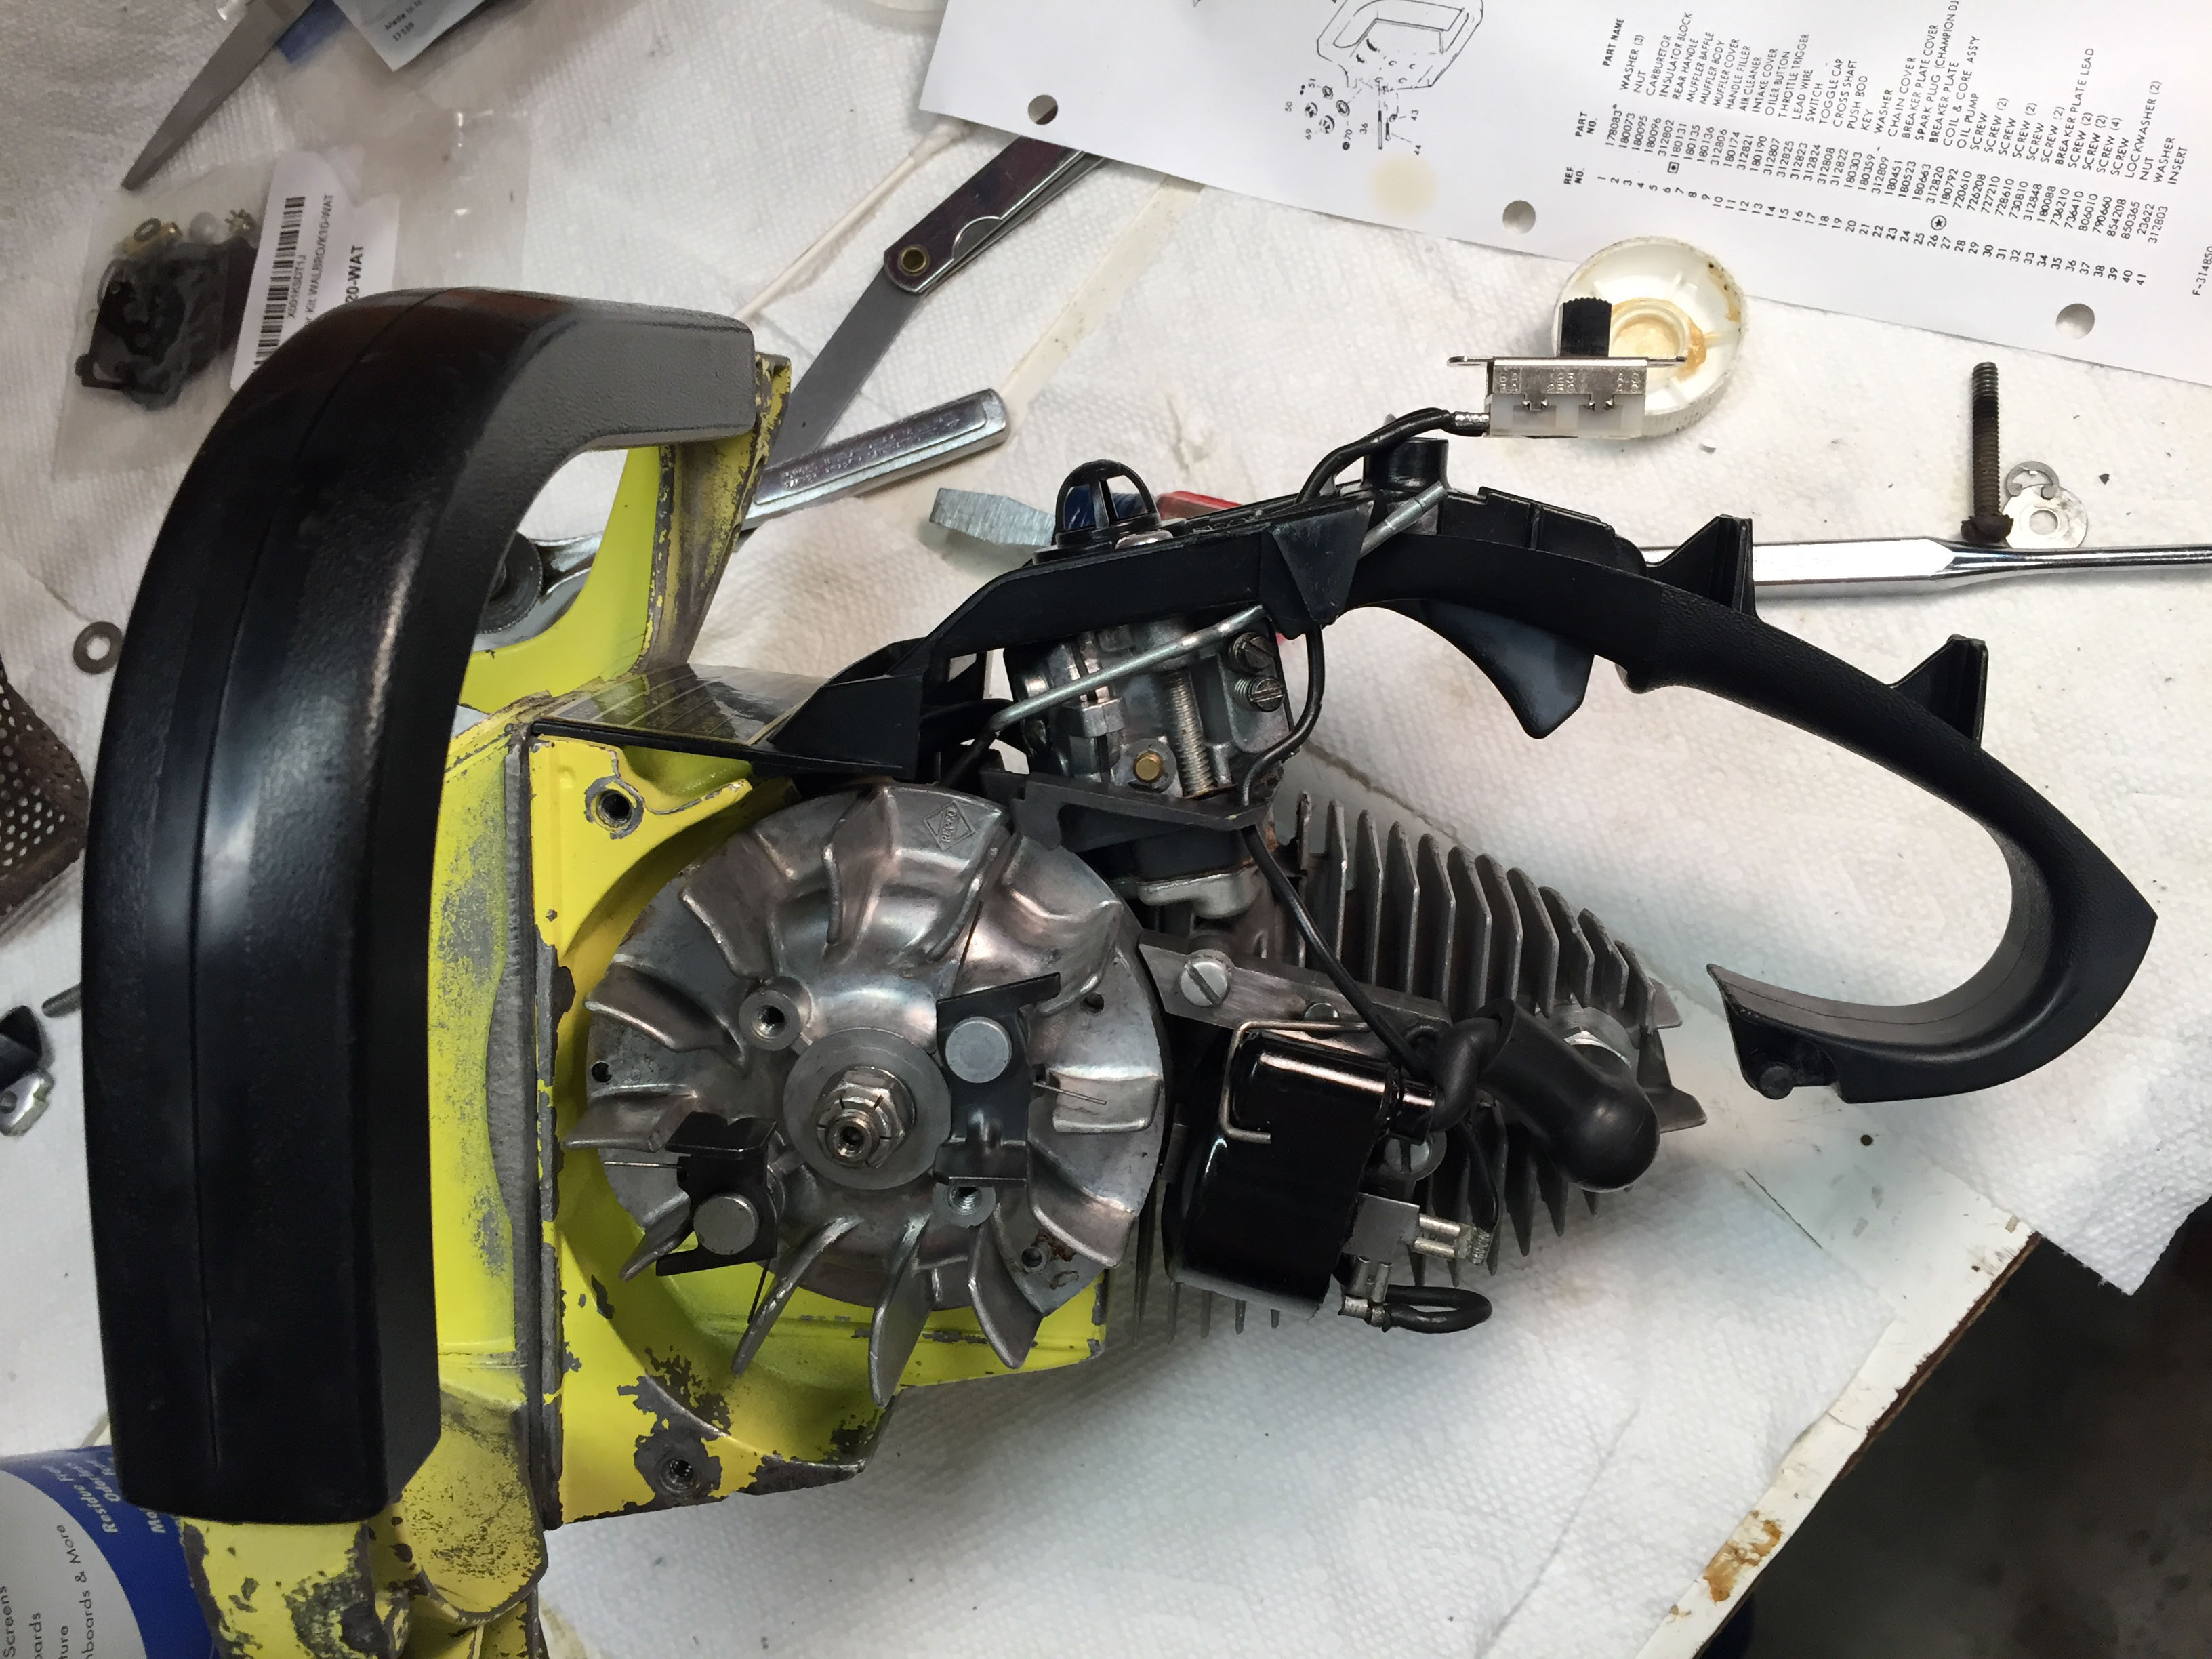
Figure 14: All back together except the covers
At this point I was able to start the engine and get it running before I put the bar and chain back on. This was really important because I wanted to make sure that the automatic oiler was working and I knew I couldn’t easily see if oil was coming out once the bar was back on. The engine ran reasonably well and the oiler worked fine after I got it primed. With that done it was time to put the bar back on and tune it up.
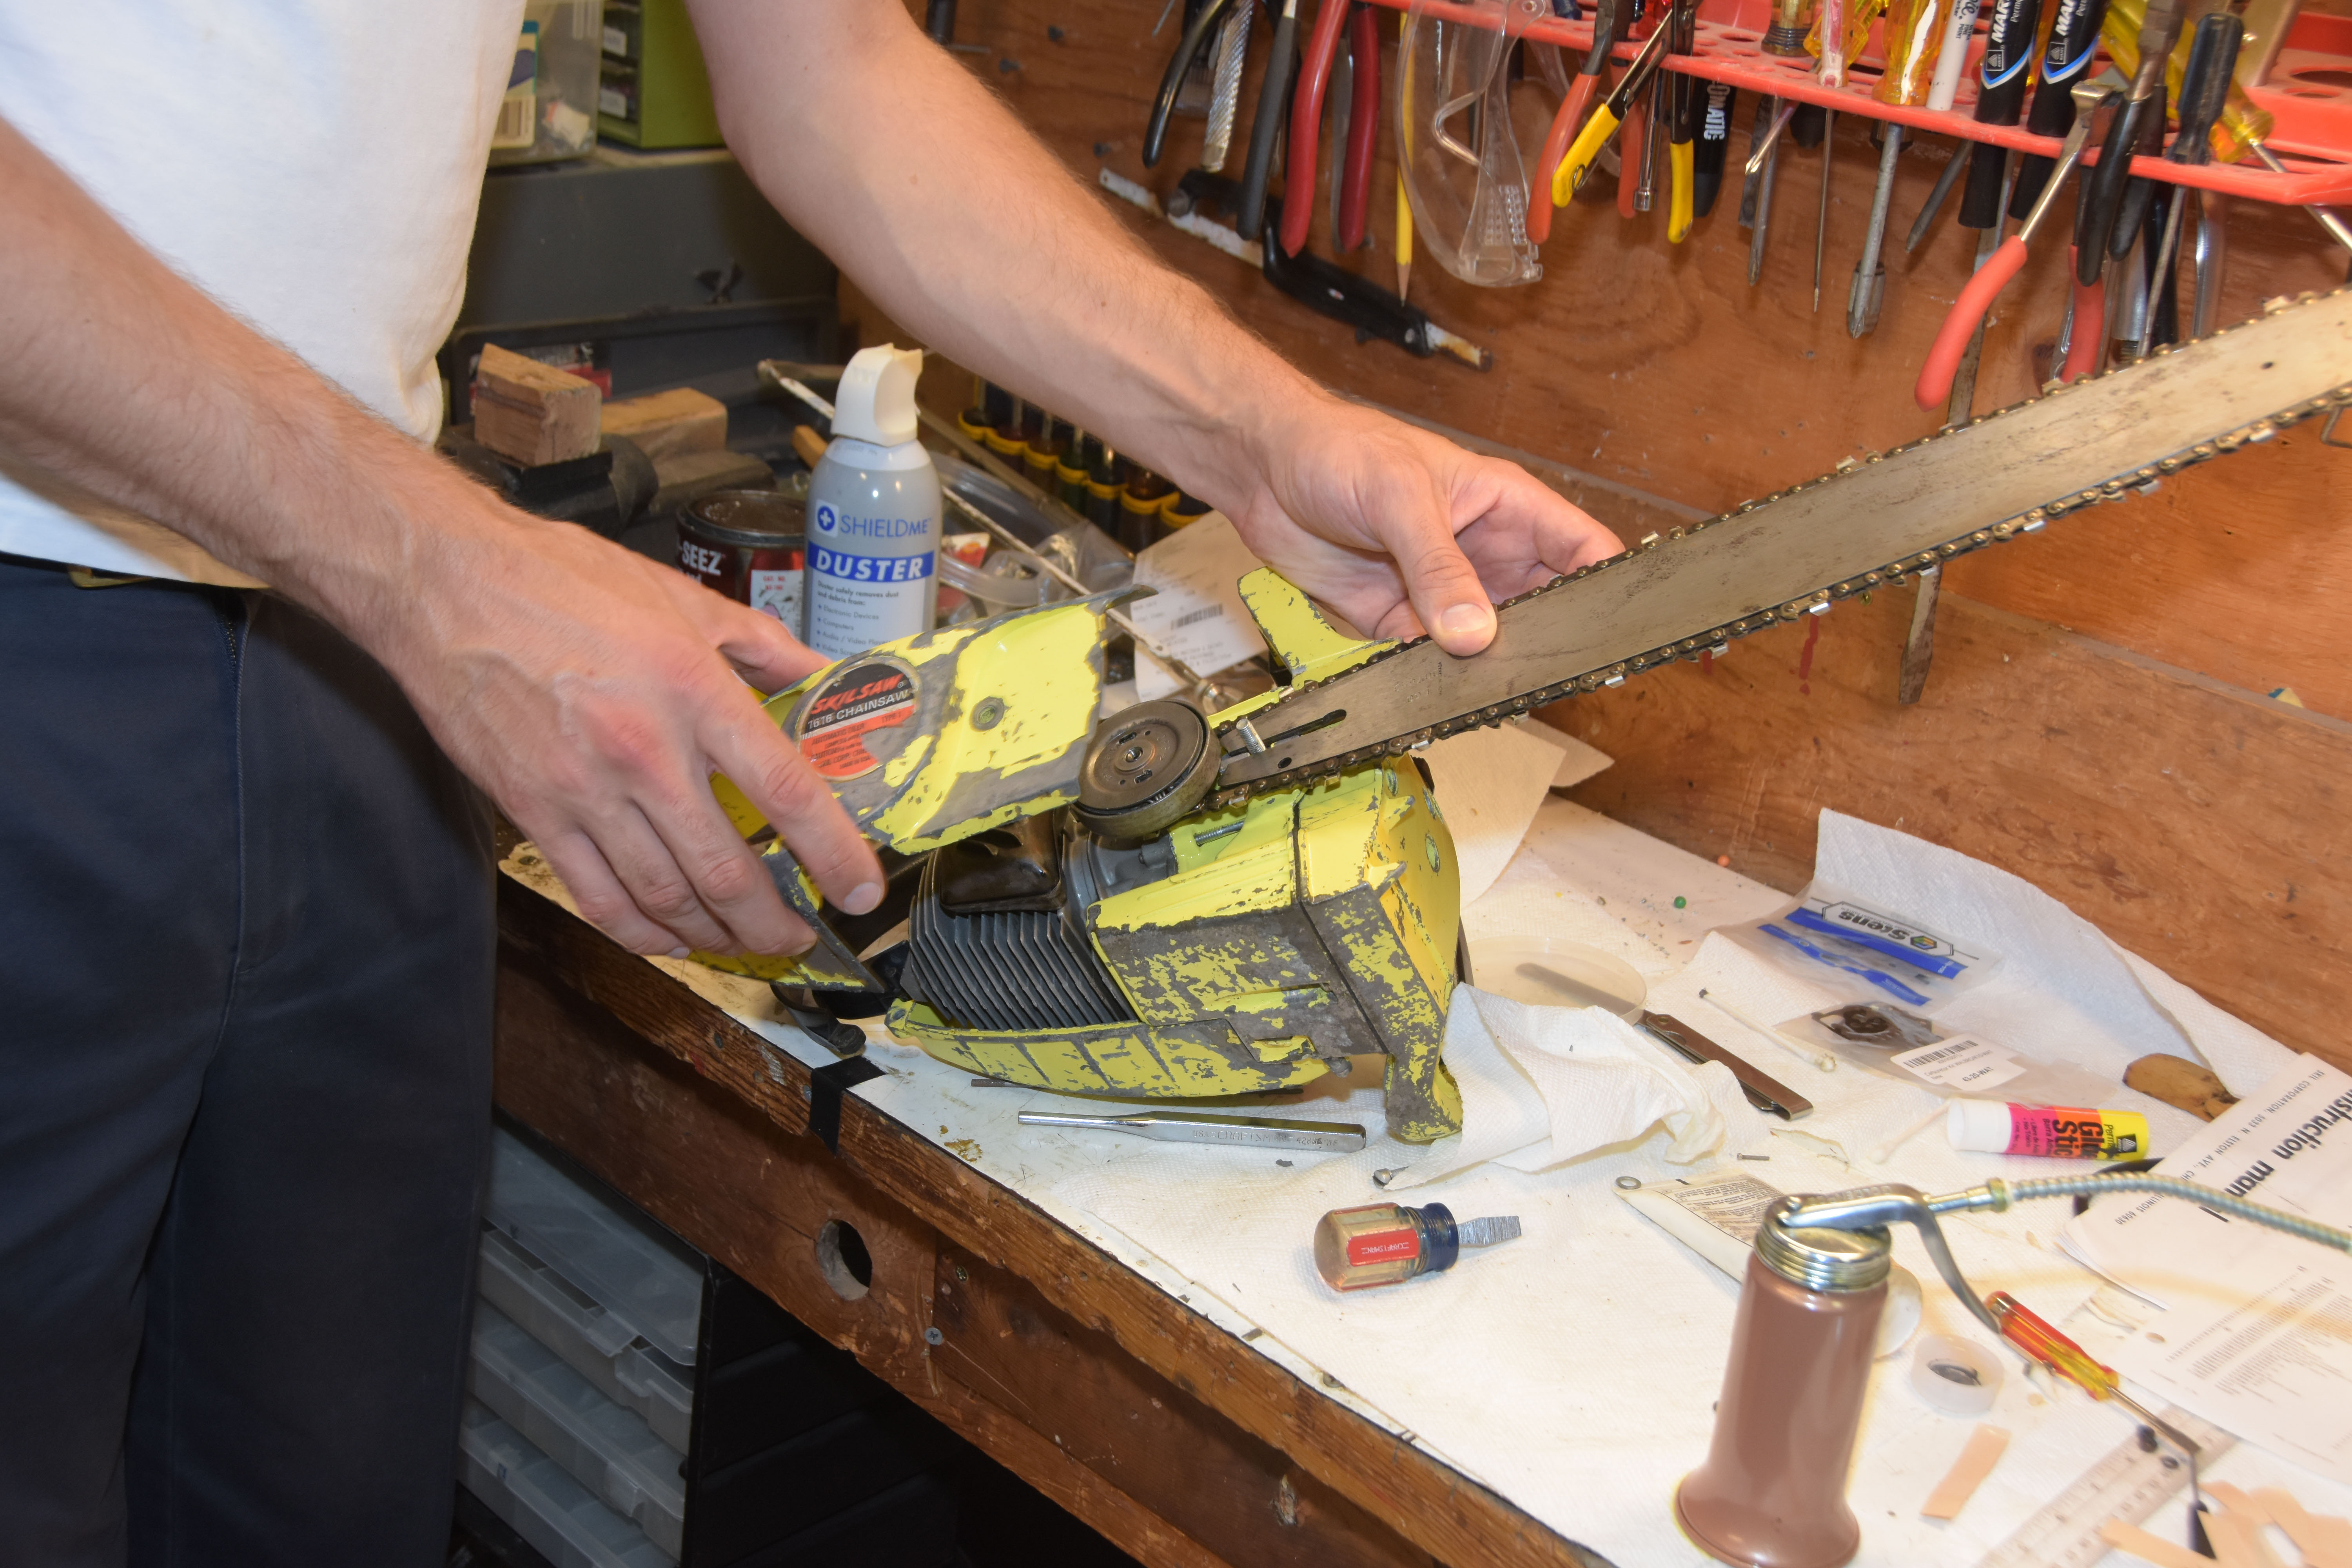
Figure 15: Putting the bar back on – almost ready for action!
With the bar back on I could run it at full throttle and get the high speed jet on the carburetor adjusted (running it at full throttle with no chain is not a good idea since it can over-speed the engine). Unfortunately at this point the carburetor still wasn’t acting right. The engine would flood easily at idle and would run even with the low speed jet adjustment all the way closed. I took the carburetor apart again and found that the valve body I had worked on was loose – I had been too gingerly pressing it back in. A more forceful pressing and it started working fine.
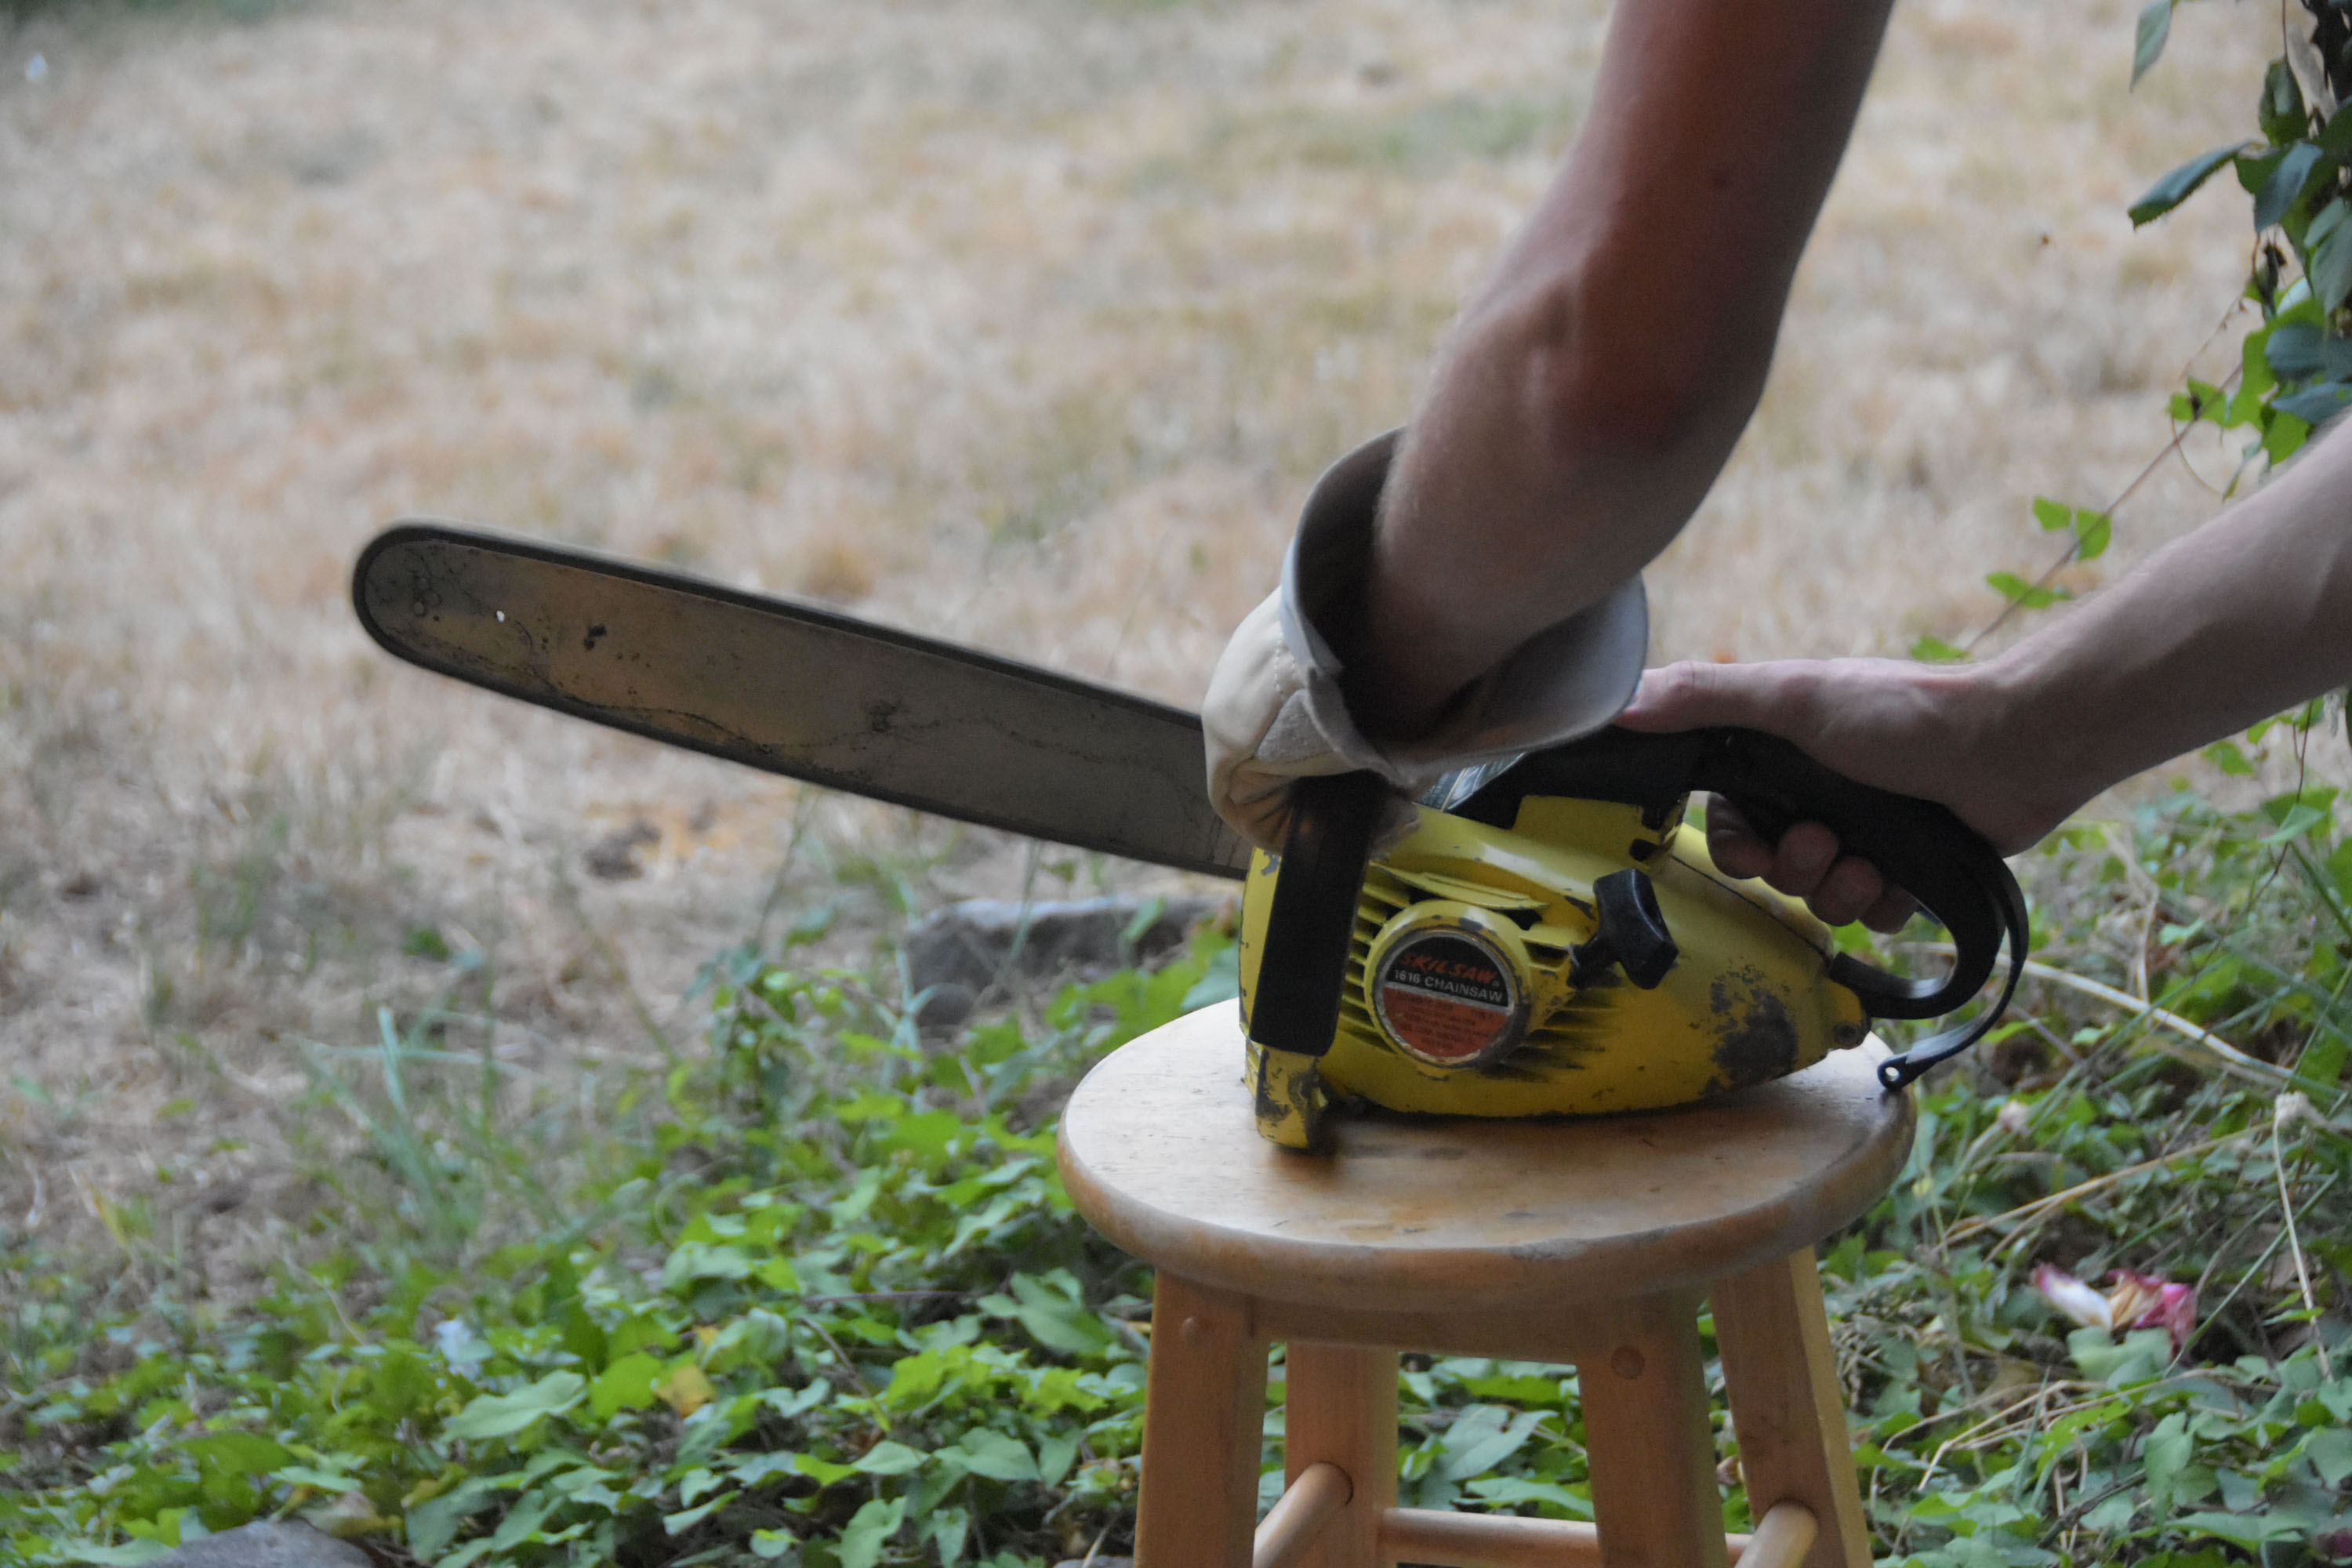
Figure 16: First run with a bar and chain – getting ready to tune the carburetor
Finally, I had a working chainsaw and could cut up the limb that came down last winter. A bit more of a project than I had in mind when I offered to do a bit of yard-work, but hey, I had fun learning a lot about foam, gaskets, and small engine repair, so it was worth it just for that.
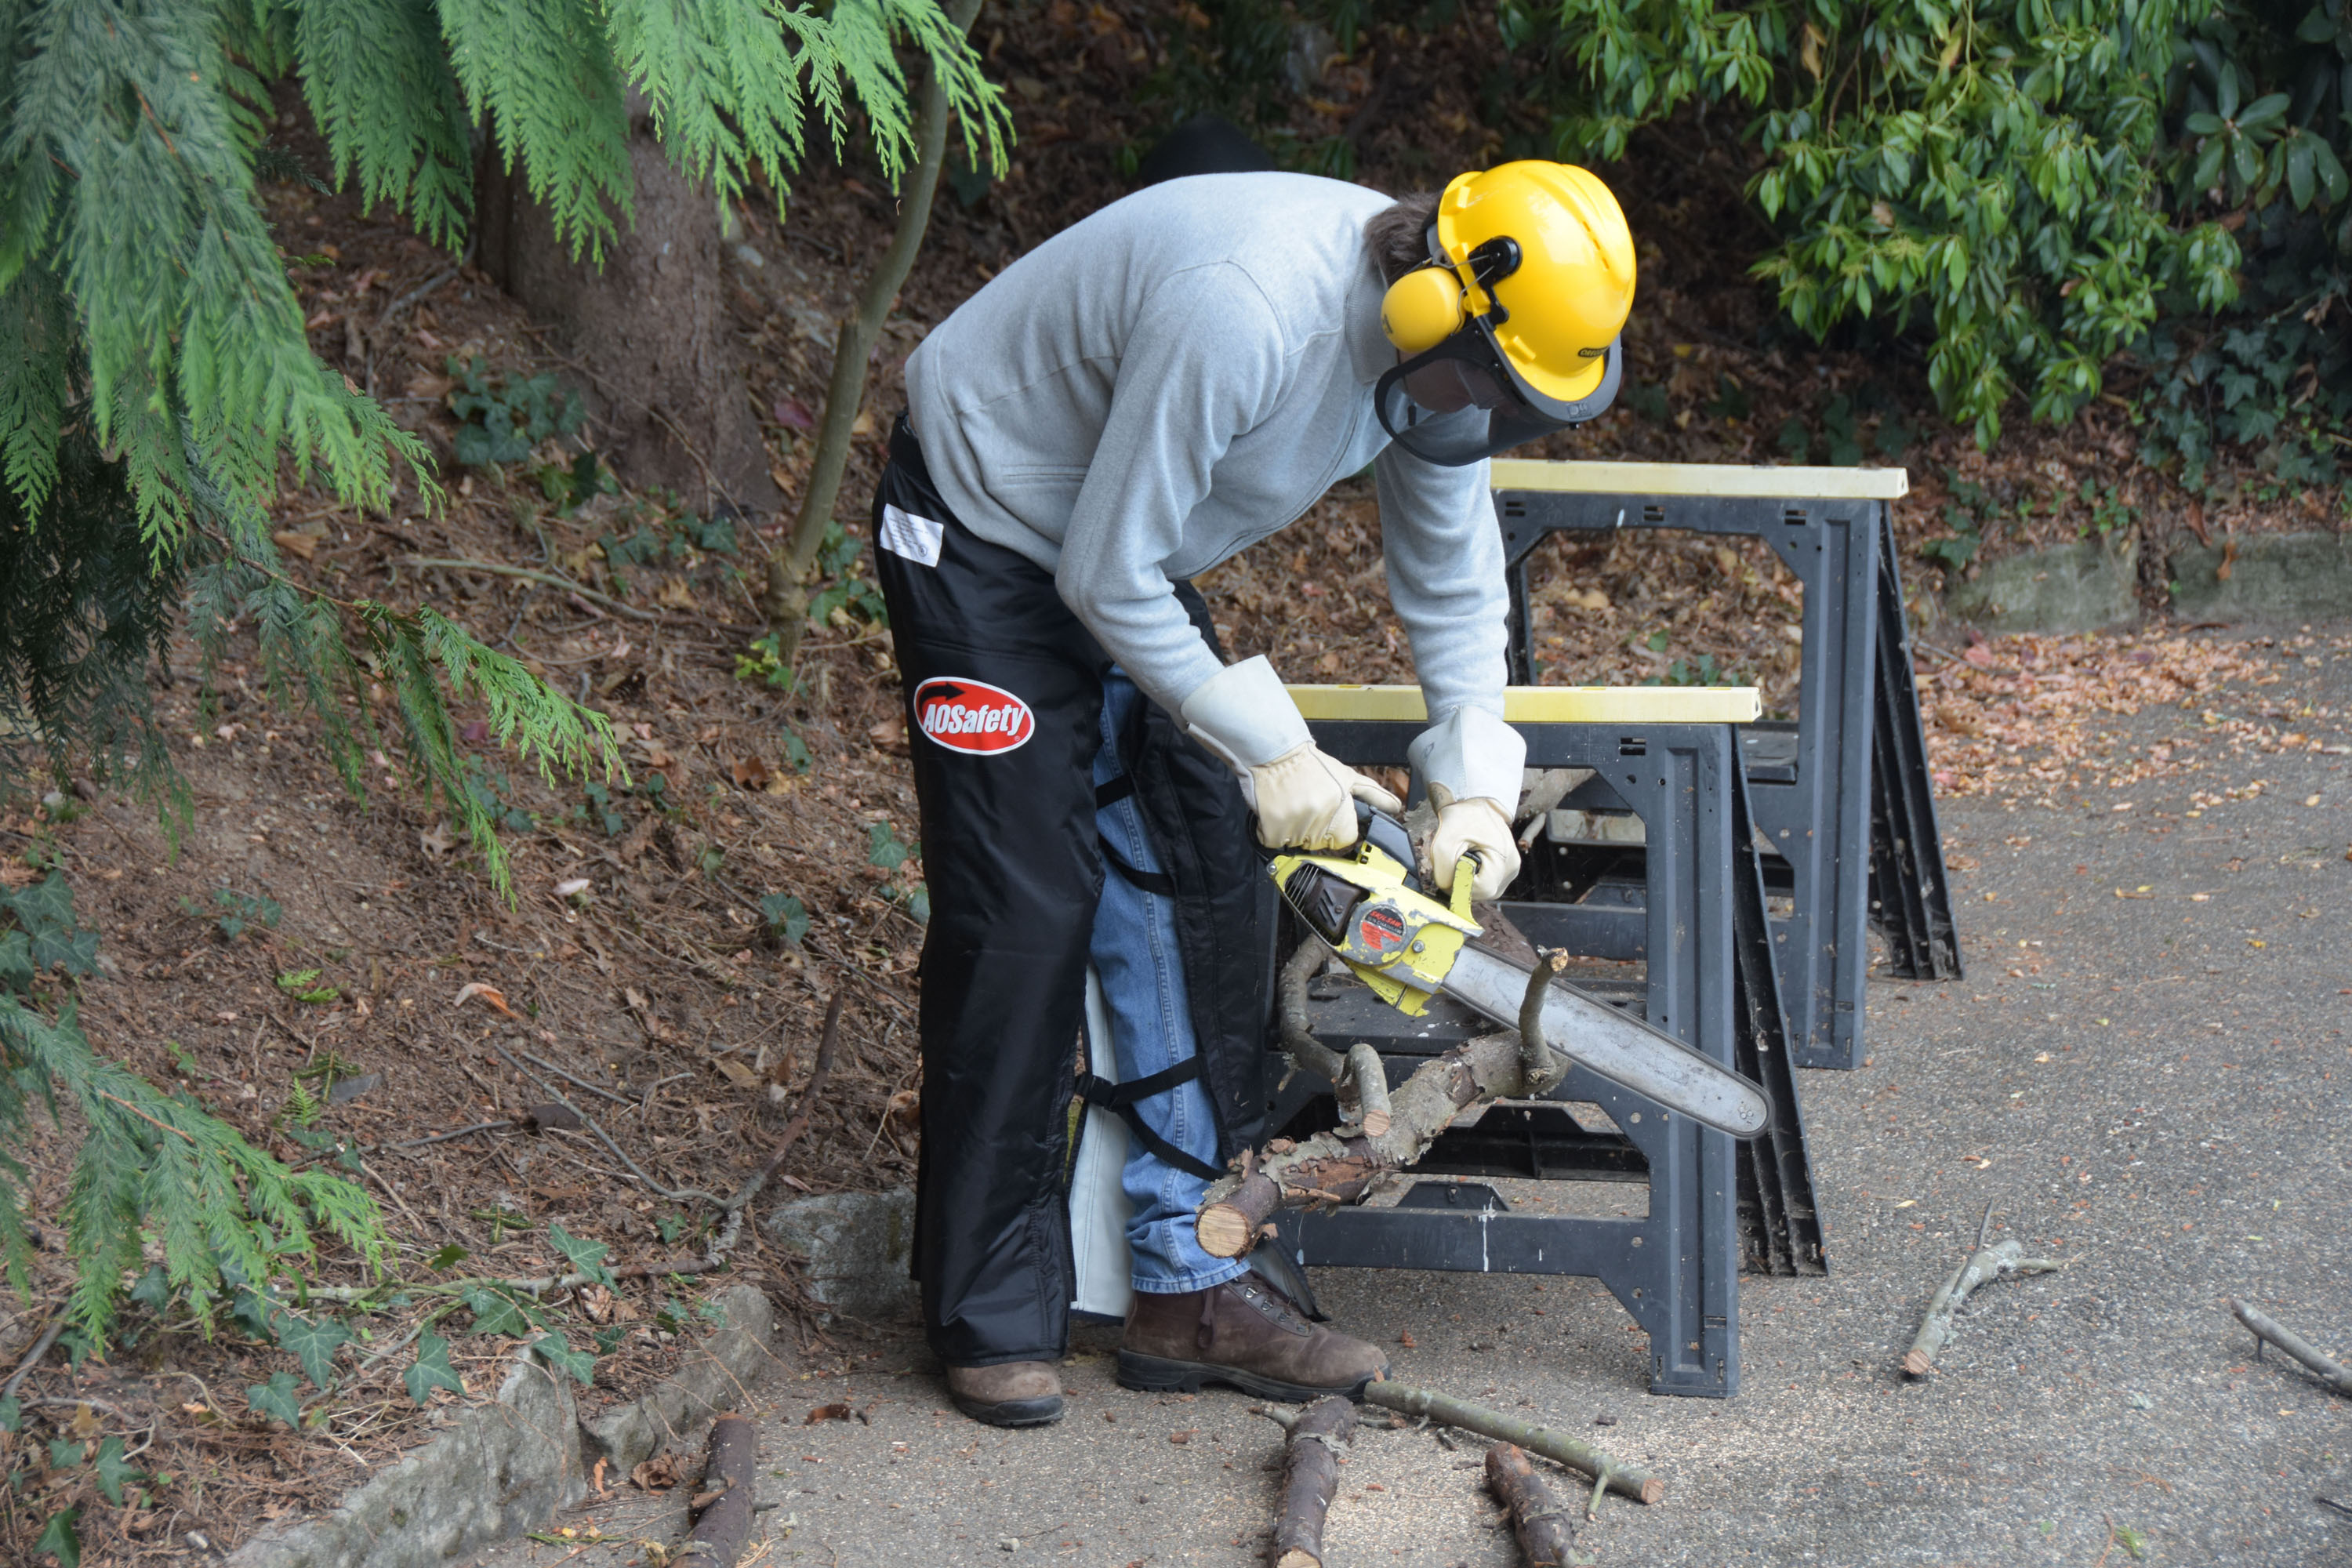
Figure 17: Here I am cutting up the branch
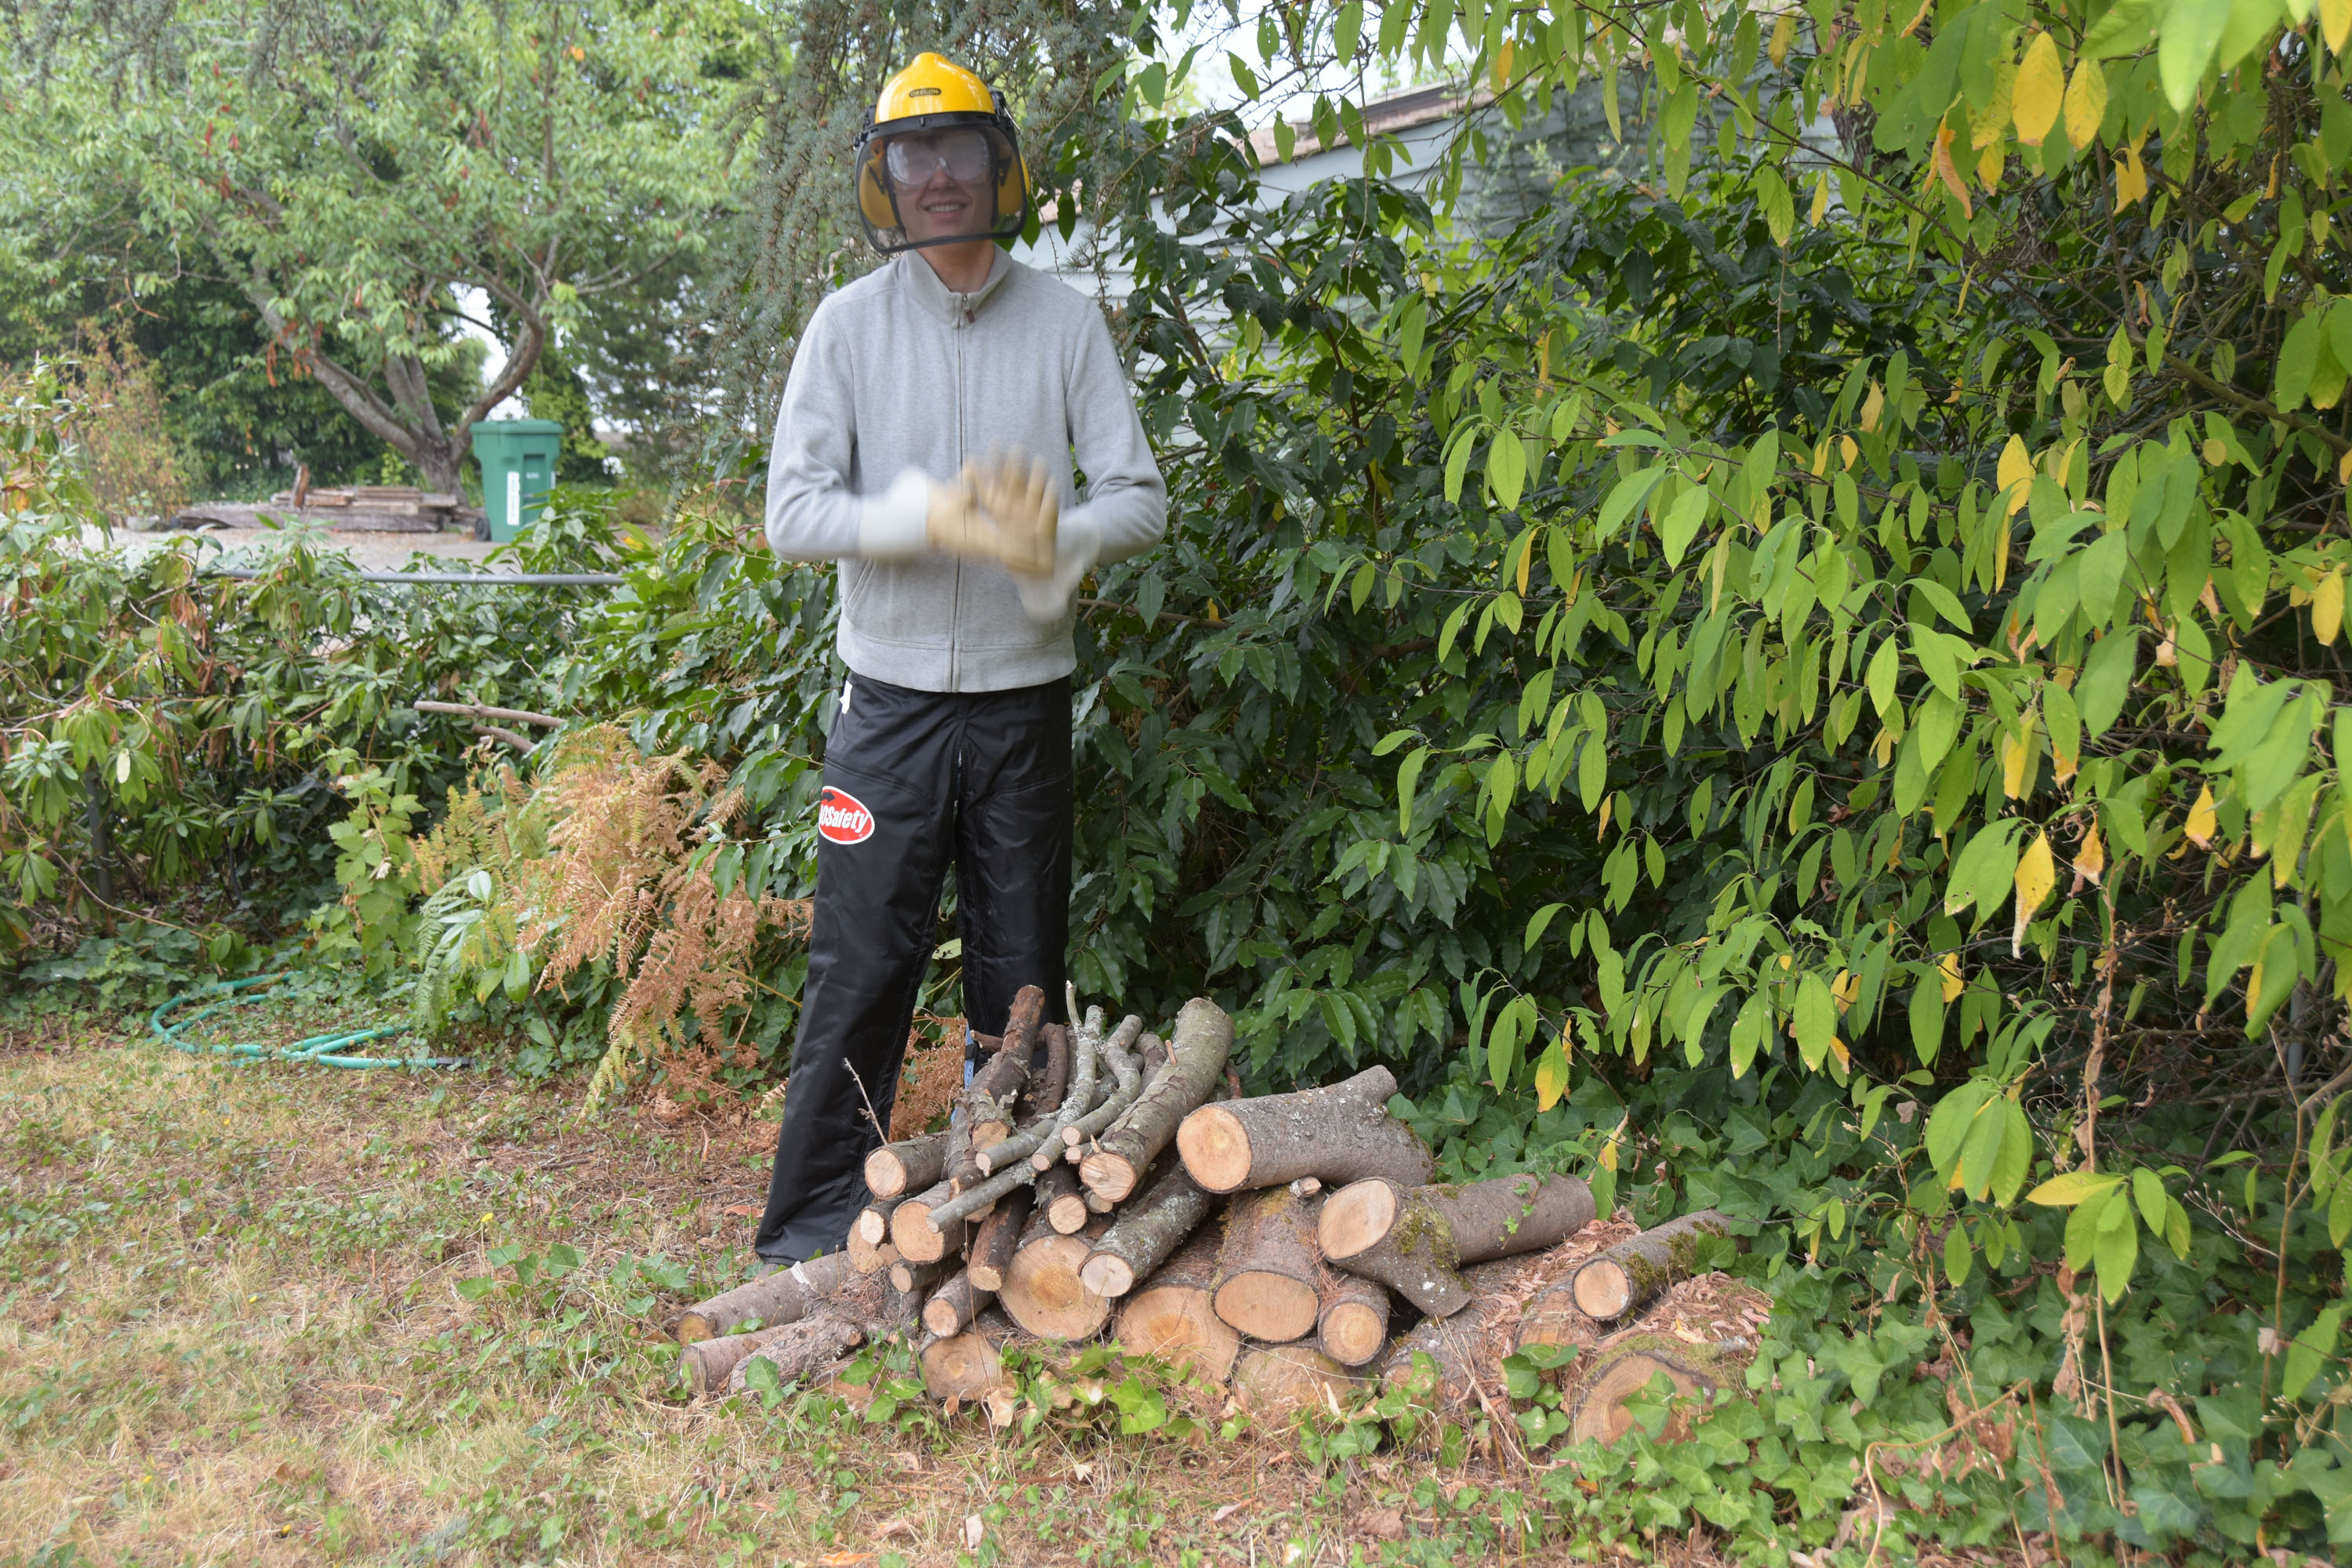
Figure 18: The branch is cut and stacked on the wood pile. A job well done if I dare say so myself!
In the process of rebuilding the saw I found substitutes or cross-references for most of the consumable parts and I scanned all the gaskets. The table below contains this information and should be invaluable for anyone else working on one of these saws.
Table 1: Skill 1614 and 1614 Chainsaw Parts Cross-Reference
| Description | Ref. | Skil P/N | Description of Replacement | Link to Drawing |
| Air Cleaner | 10 | 180174 | Cut down Homelite A-65178 filter. See drawing. | 180174 Air Filter.zip |
| Flywheel Key | 19 | 180303 | Homelite 69250 is a possible replacement? Original is 0.168″ wide, 0.365″ long, 0.059″ thick. See drawing. | 180303 Flywheel Key.zip |
| Spark Plug | 23 | 180523 | Champion DJ8, Autolite 2956, or NGK BM6F | N/A |
| Breaker Plate (points) | 24 | 180663 | Use Homelite A-69336 | N/A |
| Coil & Core Ass’y | 25 | 312820 | Use Homelite 69323 | N/A |
| Oil Tank Cap Gasket | 51 | 180258 | Cut gasket out of 1/16 cork-rubber gasket material such as Fel-pro 3018. OD=1.08″, ID=0.70″ | N/A |
| Sprocket | 54 | 71904 | Use Oregon 28001 | N/A |
| Rewind Spring | 62 | 180317 | At least one aftermarket part was made – Herr OSS 352 – but it is very hard to find. | N/A |
| Starter Rope | 65 | 180335 | #3-1/2 standard white stater rope, 3ft. (Oregon 31-732 or Stens 145-600) | N/A |
| Gas Tank Cap Gasket | 70 | 180186 | Cut gasket out of 1/8 cork-rubber gasket material such as Fel-pro 3019. OD=1.28″, ID=0.90″ | N/A |
| Main Bearing | 75 | 180030 | INA SNH87 (hard to find – may be possible to order direct from INA?) | N/A |
| Bearing Seals | 76 | 180033 | Oil seal with spring. 0.75 OD, 0.5ID, body thickness 0.125, overall thickness 0.150. Substitute Homelite 94638, 68519, or 9108, or SKF 4913 | N/A |
| Fuel Hose | 78 | 180206 | Nitrile or Viton, 1/8″ID x 1/4″OD. Length=7.5″ | N/A |
| Fuel Filter | 79 | 180635 | Purchase foam element from D’Asaro Designs and reuse plastic hose barb | 180635 Fuel Filter.zip |
| Oil Tank Duck Bill Valve | 93 | 43262 | Use Homelite 560955001 | N/A |
| Intake Manifold Gasket | 95 | 180097 | Cut gasket out of 1/64 fiber gasket paper such as Fel-pro 3022. See drawing. | 180097 Intake Manifold Gasket.zip |
| Carburetor Gasket | 96 | 180098 | Cut gasket out of 1/64 fiber gasket paper such as Fel-pro 3022. See drawing. | 180098 Carburetor Gasket.zip |
| Tank Gasket | 97 | 180246 | Cut gasket out of 1/16 fiber/rubber gasket paper such as Fel-pro 3187. See drawing. | 180246 Tank Gasket.zip |
| Oil Pump Gasket | 98 | 180252 | Cut gasket out of 0.025″ thick fabric reinforced nitrile rubber. Hard to find – try Aero Rubber. See drawing. | 180252 Oil Pump Gasket.zip |
| Combination Tool | N/A | 71093 | Use Oregon 57-001 | N/A |
| 1614 Chain | N/A | 71902 | Use Oregon S52 | N/A |
| 1616 Chain | N/A | 71903 | Use Oregon S56 | N/A |
| 1614 Bar | N/A | 71912 | Use Oregon 140SDEA064 | N/A |
| 1616 Bar | N/A | 71913 | Use Oregon 160SDEA064 or 160SPEA064 | N/A |
| Oil Pump O-Ring | N/A | Part of 180790 | Standard buna-n o-ring, 009 size | N/A |
| Fuel Hose Grommet | N/A | N/A | Standard nitrile grommet, OD=1/2, ID=1/4, Groove width=1/16, Groove diameter=3/8 | N/A |
| Rebuild kit for Walbro W8A (WA8) Carburator | N/A | N/A | Use Rebuild Kit Walbo K10-WAT or equivalent | N/A |
| Rebuild kit for Tillotson HU-4A Carburator | N/A | N/A | Use Rebuild Kit Tillotson RK-14HU or equivalent | N/A |
| Scabbard | N/A | N/A | Use Oregon 28934 | N/A |
Notes: The Skil part numbers and reference designators correspond to those in the manual for the saw.
In case anyone was wondering, and at the risk of opening up a flame war in the comments section, I will now give my opinion on the hotly debated topic of fuel mix ratios in vintage saws. From what I have read it should be safe to use 32:1 (or 40:1) fuel mix ratios in vintage saws made for 16:1 as long as the following conditions are met. First, a modern high quality synthetic 2-cycle oil must be used. Second, the saw must have needle bearings and not sleeve bearings for the crankshaft and rod. The Skil 1614/1616 do use needle bearings but some vintage saws from the 1950’s/1960’s and earlier didn’t. For what it is worth, I run TruFuel 40:1 in all my 2-cycle engines and have not had any problems. Do be aware that the carburetor will need to be readjusted if you switch mix ratio. The reason it works to reduce the amount of oil in the mix is that modern synthetic oil has a much higher lubricity than the oils used in the past. In other words, modern engines run on a leaner mix primarily because of improvements in oil rather than improvements in engine design or materials.
As a final note, the early Skil 1616 and 1614 saws (like mine) do not have chain brakes or other modern safety features. However, even if they did, all chainsaws (new or old) are dangerous and need to be operated carefully and only while wearing the proper personal protective equipment (PPE) including chaps, a helmet, hearing protection, eye protection, sturdy boots, long sleeves and gloves. Always be aware of the dangers while operating a saw and never do so under the influence of drugs or alcohol. Before operating a chainsaw be sure to read up on chainsaw safety and never attempt to cut with the tip of the bar. I take no responsibility for any injuries or damage that occurs as a result of attempting to repair or operate a chainsaw.
-Matthew D’Asaro
WOW!
Now I understand my problem with small gasoline engines a little better.
I just gave up on them and went to electric chain saws and weed-eaters and lawn mowers because the gasoline small motors stopped working the second year (undoubtedly due to ethanol decomposition and thereby motor deterioration). I was fascinated by your journey in repair whereas I just junked the non-functioning objects with some anger directed at my incompetence at proper maintenance.
Along the same line, my trusted car mechanic has strongly recommended that I add a can of “SeaFoam auto marine fleet motor treatment’ to each tank of gasoline I put in my 1997 Ford Lincoln that you drove when you visited us here in San Antonio. It is expensive but less expensive than rebuilding the motor.
Thank you for emailing me this update to the happenings at D’Asaro Designs.
Love – Uncle George
Thanks for your work on this article, I just happened to be dragging out a Skil 1612 that I was given with some other saws a while back and I googled the odd fuel filter arrangement. I’ve worked on many chainsaws, even some late ’70s consumer-grade saws like these, but your info here was very helpful. Anyway, I wanted to note two things…
First is that this particular saw I have here doesn’t have a foam filter but rather some sort of fiber that has held up well, so unfortunately I can’t thank you by purchasing your recreation. It’s an early saw with 1/4″ pitch sprocket, so they must have switched over at some point.
Secondly, saws with this general design were sold under a plethora of brands, so to increase hits you could include a bunch more of them here and on your ebay listing. This is absolutely an incomplete and unverified list, but this design was manufactured from at least 1973 mostly by Trail Manufacturing in Trail, BC and sold with various differences (color, chainbrake, anti-vibration, different caps and recoil/clutch cover designs) as: Frontier Mark I, F35, FB35; Husqvarna 34, 35; Jonsereds M36, M361, M361av, M365; Skil 1610, 1611, 1612, 1613, 1614, 1616; Partner 1612, 1613, 1614, 1616.
I do not know how many used the same filter setup, I know the Husqvarna 34 that I fixed a few years back had a “normal” fuel pickup, and the IPLs for both the 34 and 35 show normal filters.
Thanks again!
Thank you so much for the kind words and useful information. I will do some more research on what models might use my special fuel filters.
-Matthew
Matthew, My sincere appreciation for the details included in your article. My father-in-law has 2 chain saws sitting in his shed. One being a 1616 just like yours. I’ve struggled with deciding whether to sell it out for parts or work to resurrect it. I’ve decided to give it some TLC and get it running. I’m not convinced that the carburetor is an issue. The fuel line looks fine. I just think that it hasn’t been used in so many years that ethanol fuel has never been run through it. I’m a little leery of rebuilding the carb which looks pretty tedious. So I brought the side down, not entirely, leaving the crank Case intact. From there I decided to just give it a good cleaning. In doing so I did take note that the coil wire easily pulled out of the coil, therefore may have had a spark issue. I remove the needles in the carburetor and took the carburetor briefly the street she phone for about three minutes. I then i’ve blown it air dried with canned air. I’m banking along the lines that as I said earlier ethanol has never been run through it. Your article has been extremely helpful for two reasons.
1. we live in a disposable society. Not many are willing to take the effort that you took with detailed research to get that Saw running. For sure the big box is A few miles away and we could just as well buy a new saw for a fairly good price, however you always get what you pay for.
2. Haven’t come across your article is inspired me to do what I believe is the right thing, fix it.
Also appreciate your cross reference chart. Extremely helpful. I look forward now to hearing this thing run shortly. Thank you so much. Tom
Pardon some mid interpretation through voice. One example: seafoam.
Thank you for your great write up.
I am trying to get mine running again, would you know where the
gas tank vent is?
Thanks for the kind words. I am glad you found it useful. The gas tank vent in built into the gas tank cap. There should be a small hole in the center of the top of the gas cap. The center portion of the bottom of the gas cap is actually a separate piece that is pressed in. You can pry this out and then clean out the vent passages inside the cap.
-Matthew D’Asaro
Thanks for the good write-up that you did on your chainsaw rebuild. I have an orange one, made in Canada without a chain brake. I’ve gotten it running pretty well after sitting for 40 years or so. The only problem is the chain oiler is manual only, and where the linkage connects to the pump behind the flywheel is broken (the cup that the linkage fits into) so I can’t oil the chain right. Any suggestions? I’ve thought about cutting a fork to go around the pump lever and connect to the original linkage, or try to find a junk saw on ebay.
Wow! As others have stated. I inherited my father’s 1616 type 1. I don’t need to do quite the rebuild job you went through however. I do need to get tank gasket, oil pump parts, and possibly carb kit. Your information is very helpful to me in this effort. Thanks for taking the time to document this in such detail!
Thanks Matthew, your terrific work-up has quickly become my go-to reference for my 1616 rebuild. The manual specifies 1:16 oil/fuel ratio, which seems pretty rich, is that what you use?
Thanks. I use 40:1. At the very end of the article I have discussion of fuel ratios.
-Matthew
Hello Mathew,
Very thorough write-up on the venerable Skil 1616 chainsaw.
I have a couple of questions if you have the time to answer.
First, I have a Skil 1613 with the Tillotson carburetor. Would you happen to know if the Tillotson is interchangeable with the Walbro?
( I have a donor Skil 1616 for parts which I have already taken the oil pump out to make my 1613 pump oil properly again)
My 1616 donor saw has the Walbro carb while my 1613 has the Tillotson which wont reach full throttle any longer. I think the fuel pump is weak and can’t keep up with the WOT demand. After dissasembling both carbs, I like the Walbro a little better and would like to swap it into the 1613 after rebuilding it first. The question is: are these 2 carbs interchangeable?
Second question is a little more general. Would you happen to know what the differences are between the 1616 and 1613 Skil? There seem to be many Skil chainsaws with 16xx as their model number. Just wondering. Thanks a bunch.
Thanks for the compliment on my writeup. I am glad people are finding it useful. I will do my best to answer your questions, but I will admit I don’t have a Skil 1613 and so I don’t know for sure. First, the Walbro and Tillotson carburetors should be interchangeable on the 1616, at least the manual implies that they are. I can’t say for sure that the carburetor on the 1613 is the same as on the 1616, but you can check the model numbers. The correct Tillotson carburetor for the 1616 is either a Walbro WA8 (aka W8A), or a Tillotson HU-4A. Second, I believe that the 16xx was the series number and the xx is the length of the bar in inches. Good luck with your project.
-Matthew D’Asaro
Hi Matthew, great work on this chainsaw restoration project. Thanks for responding to my private comment too, and figure what I ask now might be interesting to everyone else so will post here. I just started working on my dad’s old 1616 and the plug that was in it is a Champion DJ7J, and it is black as if it would have been running rich, but it looks like I can clean it up a bit and try it again. I found online that the gap is supposed to be 0.025″ so I will verify that too after I clean it . I noticed you list a DJ8 or other brands as the plug to use, and I found a website for chain saw collectors that lists the CJ6 as original, so should I even try to reuse the one I have? Our local shop handed me a CJ8 to take home, and it has a 3/4 inch base instead of a 5/8 inch for starters, so there you have it about our local chainsaw shop’s level of competence. They were really pushing me to buy a new chainsaw so not surprised they are hindering my attempt to fix what I have. Also I think they got counterfeit Champion stock too because the bottom of the plug, the part that is welded to the threaded part and hangs down under the electrode, it is not even centered over the electrode, and the spot weld has slag hanging out into the electrode area that would certainly be a hotspot to cause detonation? I did not even try to mount the plug because the 3/4 socket would damage the heat fins on the engine. I read online about spark plugs having heat ranges, and I know with cars that is pretty important, and so I was wondering if you could comment on this, and if perhaps the DJ7J is a hotter/colder plug my dad might have substituted at some point to try to make it run better? By the way, great explanation about how ethanol works as a fuel, even with chemical formulas! I have a feeling those guys may click the close button upon seeing the first equation, lol, but it’s nice as far as I am concerned.
Thanks for the compliments. I would use the sparkplug recommended in the manual.
-Matthew
Nice article. I have a Skil 1644 type 1 chainsaw. Does anyone have suggestions where I could get parts and/or a manual on it. Thank you!
Would you happen to remember if the throttle lever had a return spring of any kind or a metal return tab behind the lever in the handle? Just picked one up and it feels like it has no resistance at all and the throttle gets stuck open. Or is it completely done by the spring on the carb butterfly shaft? Thanks!!
Err. Not sure. I think it is just the spring on the carb.
-Matthew
Dude. Niiice write up. I just picked one up myself. I very much appreciate the time you took documenting and doing this write up. This will be
EXTREMELY useful.
Thank you.
Thanks so much for the compliments. Good luck with your saw.
-Matthew