Building a Punch to Make Properly Perforated 828 Film
I have been interested in film photography and vintage cameras ever since I took Bill Kuhns B&W photography class at Nathan Hale High School in Seattle, WA. I enjoyed the class so much that took it all four years of high school and by the end I was maintaining pretty much all the photographic equipment. Although that was years ago, I still have a large collection of vintage cameras which I have repaired / restored and I enjoy shooting them from time to time. That is easier said then done for some, however, because of film that is no longer available. One in particular, a Kodak Flash Bantam, which was a gift from my dearly departed grandmother, was the inspiration for the project described in this article. The Kodak Flash Bantam is pictured below.

(Photo credit Pacific Rim Camera)
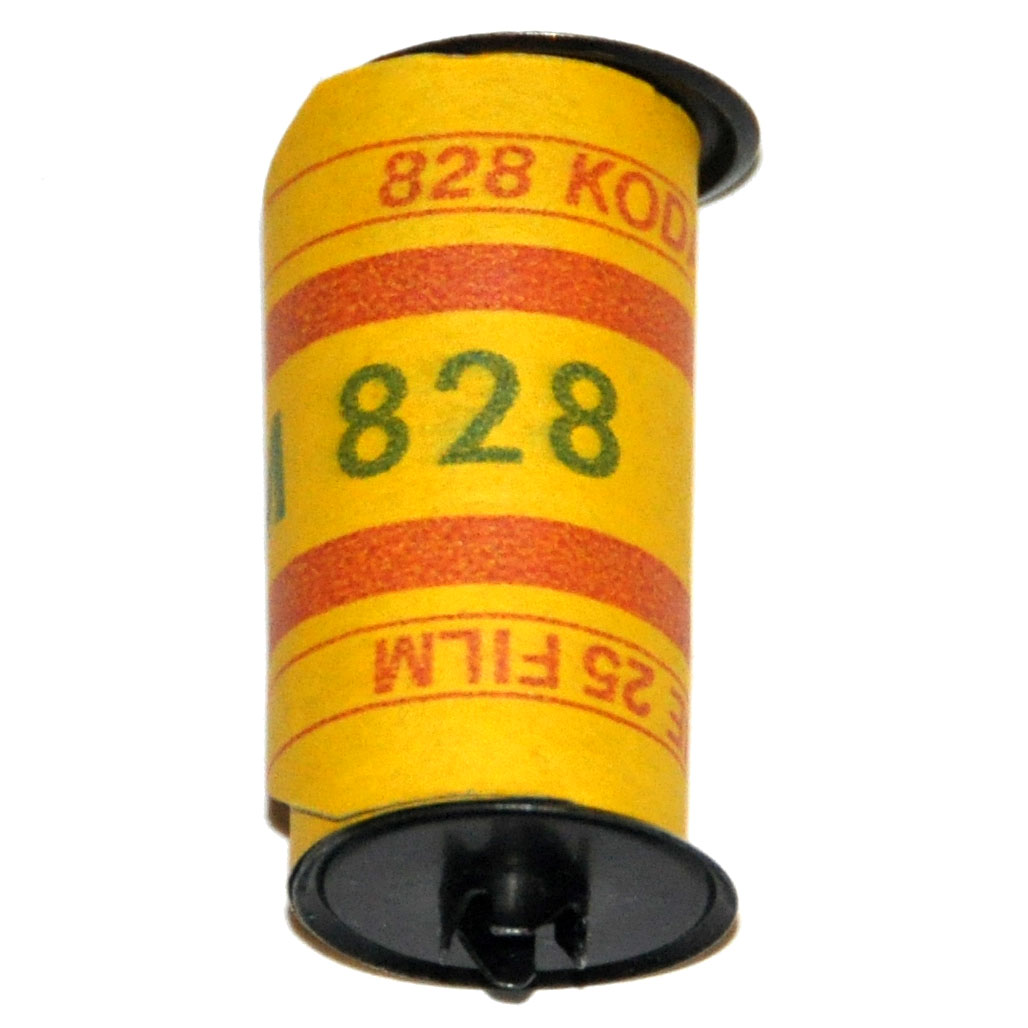
The Flash Bantam, like the rest of the Kodak Bantam series, uses type 828 photographic film, an obsolete format which hasn’t been produced by Kodak since 1985. This leaves a collector with a series of options, none of which are terribly good:
- Buy expired 828 film off of eBay and try to use it. This might have worked years ago, but since the last fresh stock is from 1985, and since most of it is Kodachrome which can no longer be processed, this really isn’t going to work well.
- Buy 828 film from Film For Classics. This is a good option which I have used in the past. The film can be bought directly from B&H Photo Video, it is black and white (which is good because you can process it at home), and it is of good quality. The problems are as follows. First, the film is expensive at $14/roll, but more importantly it doesn’t have the perforations (index holes), one per frame, which align each shot in the camera and prevent double exposures. As a result, many of my pictures were ruined.
- Buy expired 828 film off of eBay and respool it with fresh film. There is an excellent discussion of this process at bnphoto.org and another one here. There are three sources for film for this process. The easiest is to use ordinary 35mm film (828 is 35mm wide) but the sprocket holes will cut into the edges of the pictures as shown here. The sprocket holes can also interfere with the mechanism intended for the holes in 828, requiring that it be disabled somehow. Another option is to cut down 120 roll film. However, to do this well you would need to build a film slitter. The last option is to buy unperforated 35mm film, a format made for professional portrait photography. The article at bnphoto.org lists several sources for unperforated 35mm film, but all are color emulsions, not B&W. Of course, none of these sources for film will give you proper 828 index holes.
Of these three options, I think that the last is the most appealing as it has the potential to provide an inexpensive source of 828 film. I thus decided that I would build a device which could create strips of properly sized and perforated 828 film. The plan is to make and sell these inexpensive strips of film so that other ambitious camera collectors can respool their own rolls of 828. Aside from my strips of film, the only expense would be the one-time investment of an expired roll of 828 for the backing paper and spool, or else, if they have a spool, they can make their own backing paper from a roll of 120 as described in the respooling articles linked above.
Being the perfectionist that I am, I wanted my device to produce a strip of 828 film with the PRECISE dimensions of an original Kodak roll. When I couldn’t find the original specification anywhere, I decided that I would have to buy an expired roll of film and measure it. After a bit of hunting on eBay, I found an old roll of Kodachrome 828 which had obviously (from the auction pictures) been totally exposed to daylight. This seemed a fitting roll to sacrifice so I bought it.
After a couple hours with a dial caliper, I was able to produce an accurate drawing of the 828 film format. This drawing is shown below and is also available in PDF format. Note that the drawing shows the film with the emulsion facing down.

Now knowing the dimensions, I set about trying to figure out how to make a device which would cut the film appropriately. I quickly realized that there are three separate operations that need to be performed:
- Cut the film to width (if using 120 film)
- Cut the film to length
- Punch the index holes (perforations)
At first I wanted to build a film slitter which would simultaneously perform all three, but I quickly realized that this was too complex for me to easily fabricate and I was not sure how a rotary device would assure proper spacing the the holes. Thus, I settled on separating the slitting device from the punching device. Besides being easier to build this plan was advantageous because it would allow the slitting device to make film of other formats that needed unperforated 35mm film (like 126 for example) and it would allow the punching device to be used on commercial unperforated 35mm stock.
Since I am still hopeful that I will find a commercial source of unperforated 35mm black and white film, I decided to start by making the film punch. Figuring out how to make this device, however, was not so easy. First, the punch itself needs to be tiny (2mm x 2.3mm) and precise. Second, the spacing between the holes needs to be set accurately. After much thought I realized that I could use the Minitch Machinery Corp Mini-Mill/2 desktop CNC milling machine at work to make the punch and its corresponding die hole. That left the question of how to space the holes accurately. Since there are 8 holes in the standard length 828 roll, I first thought that I might build a device with 8 separate punches. However, I realized that this would make the entire device excessively complex and too large to use conveniently in a changing bag, plus it would prevent making strips of film with more then 8 holes. I then thought of making a device with a wheel to measure the distance between the holes. This concept, however, was complex to execute and I was not sure of its accuracy. Finally, with the help of a close friend, I realized that after I punched the first hole, I could use a ball detent mechanism to place it a precise distance away from the punch and thus punch the next hole accurately! Repeating this process would thus allow each hole to be punched in the correct location. What’s more, I could use the edges of the slitting device to make the leader and tail of the film the correct lengths.
With this design in mind, I set about creating the device. After a couple false starts and some wasted stock I was eventually able to make a device that worked very nicely. One of the most important realizations was that commercial ball detent devices will not work well in this application. The commercial devices I tried were imprecise in that the balls were not held tightly against lateral movement. They also didn’t allow the ball to protrude far enough from their ends, and the spring pressures tended to be too high. Thus I had to make my own. Once that was solved, the rest mostly fell into place. The finished punch is pictured below:
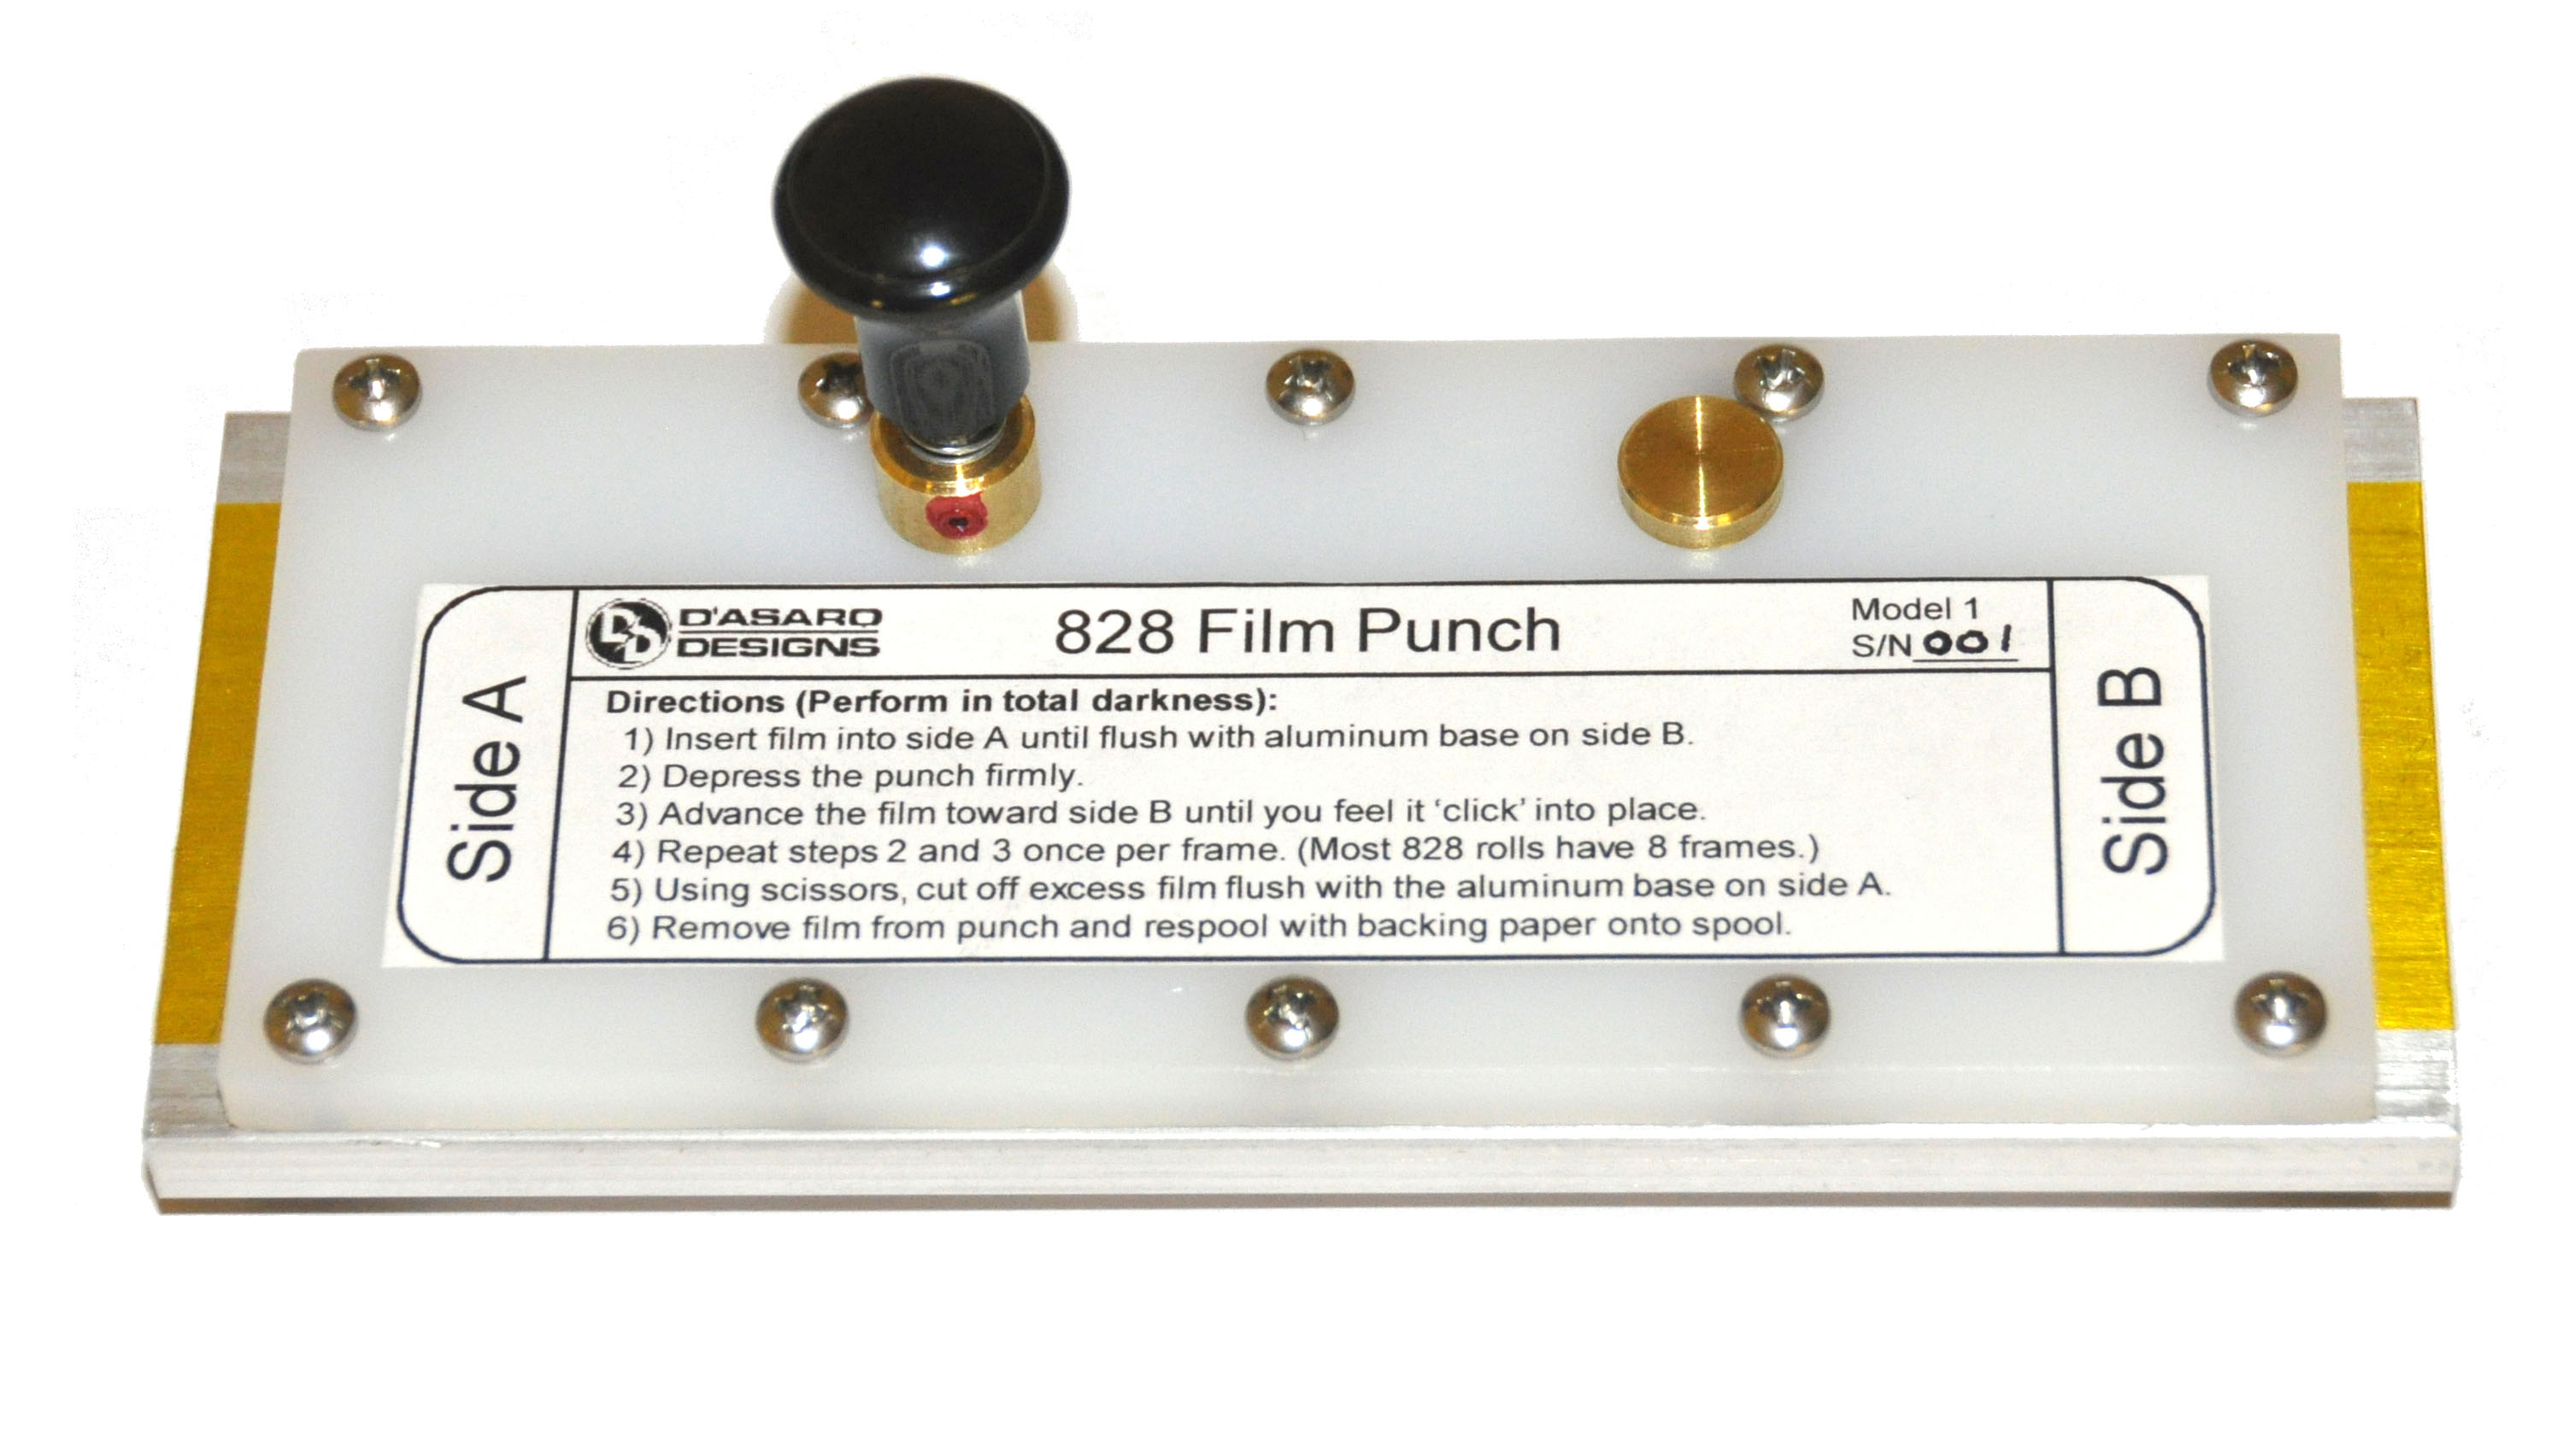
The device is operated in total darkness (and while wearing cotton gloves) as follows:
- Insert the film into side A, emulsion side down, until it is flush with aluminum base on side B.
- Depress the punch knob firmly until it clicks, then release it.
- Advance the film toward side B until it ‘clicks’ into place – this is the ball detent mechanism finding the hole.
- Repeat steps 2 and 3 for a total of 8 holes.
- Using scissors, cut off excess film so that it is exactly flush with the aluminum base on side A.
- Remove the film from the punch and respool it with backing paper onto spool.
Note that all these steps can be done by feel.
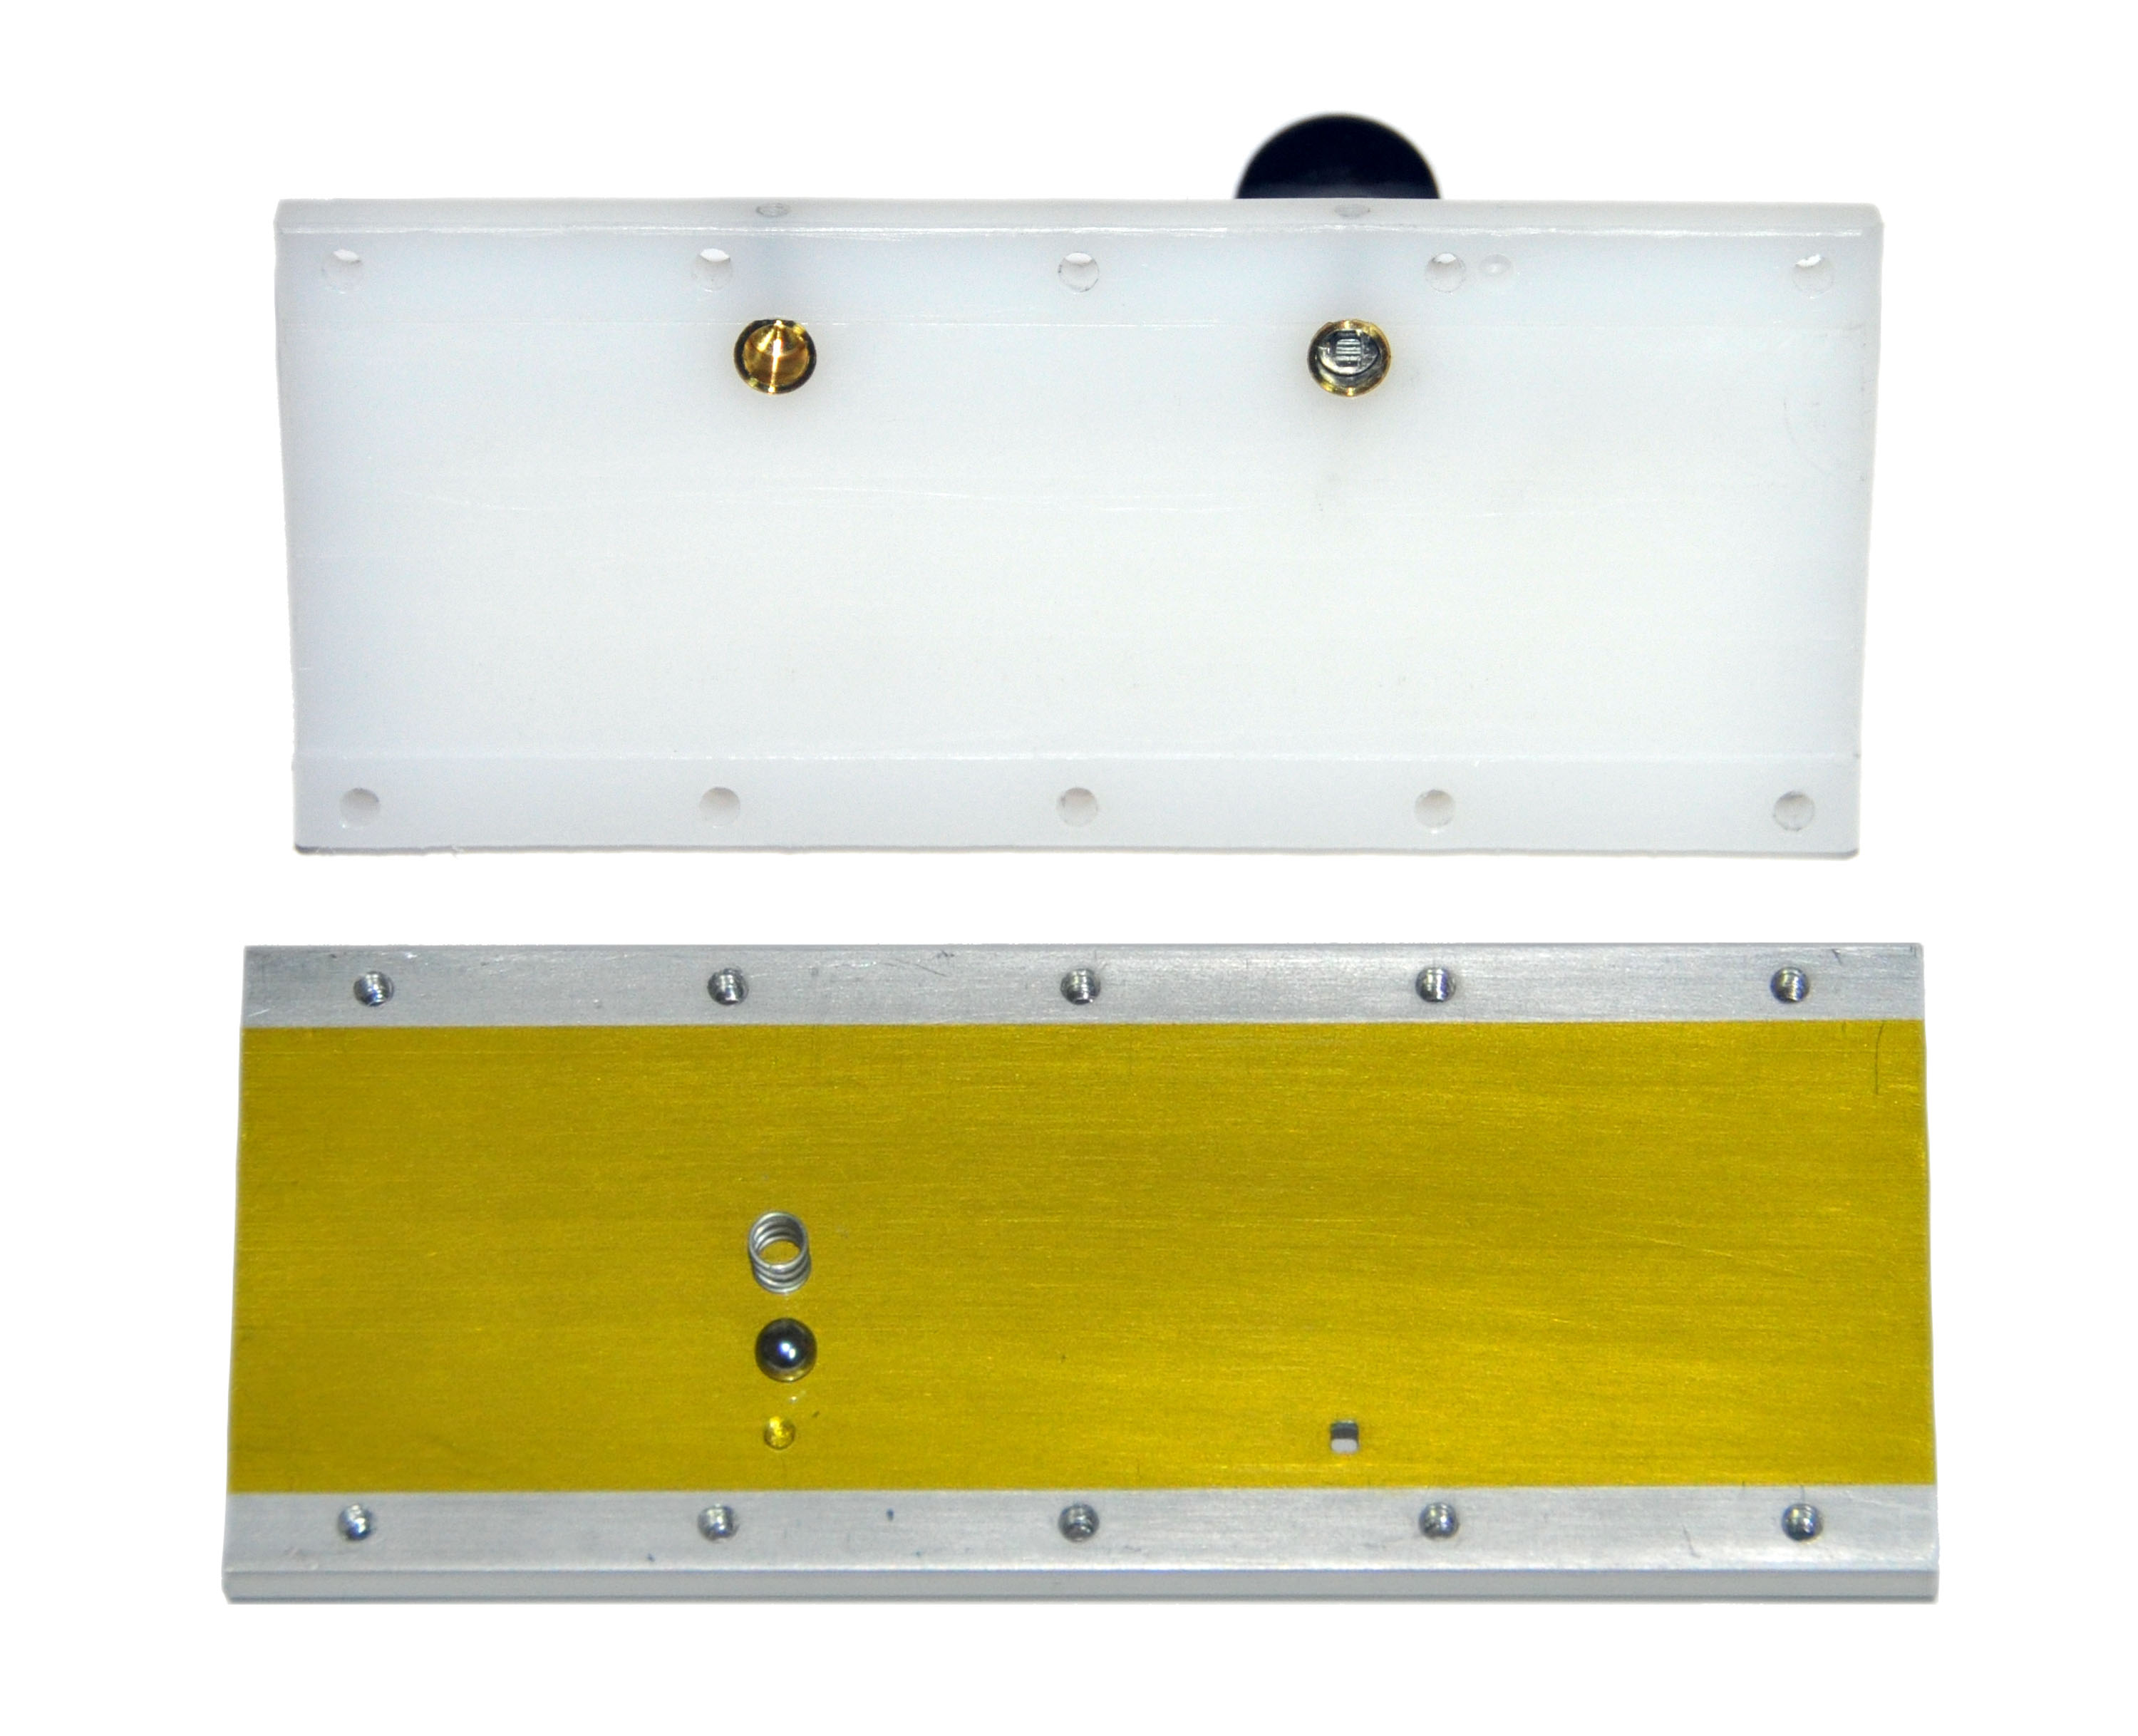
I carefully designed the film path to assure that all the parts that touch the film are smooth plastic (note the yellow tape over the aluminum base) and that there are no sharp edges on on the ball detent device or the retracted punch. The photo below shows the inner workings of the device
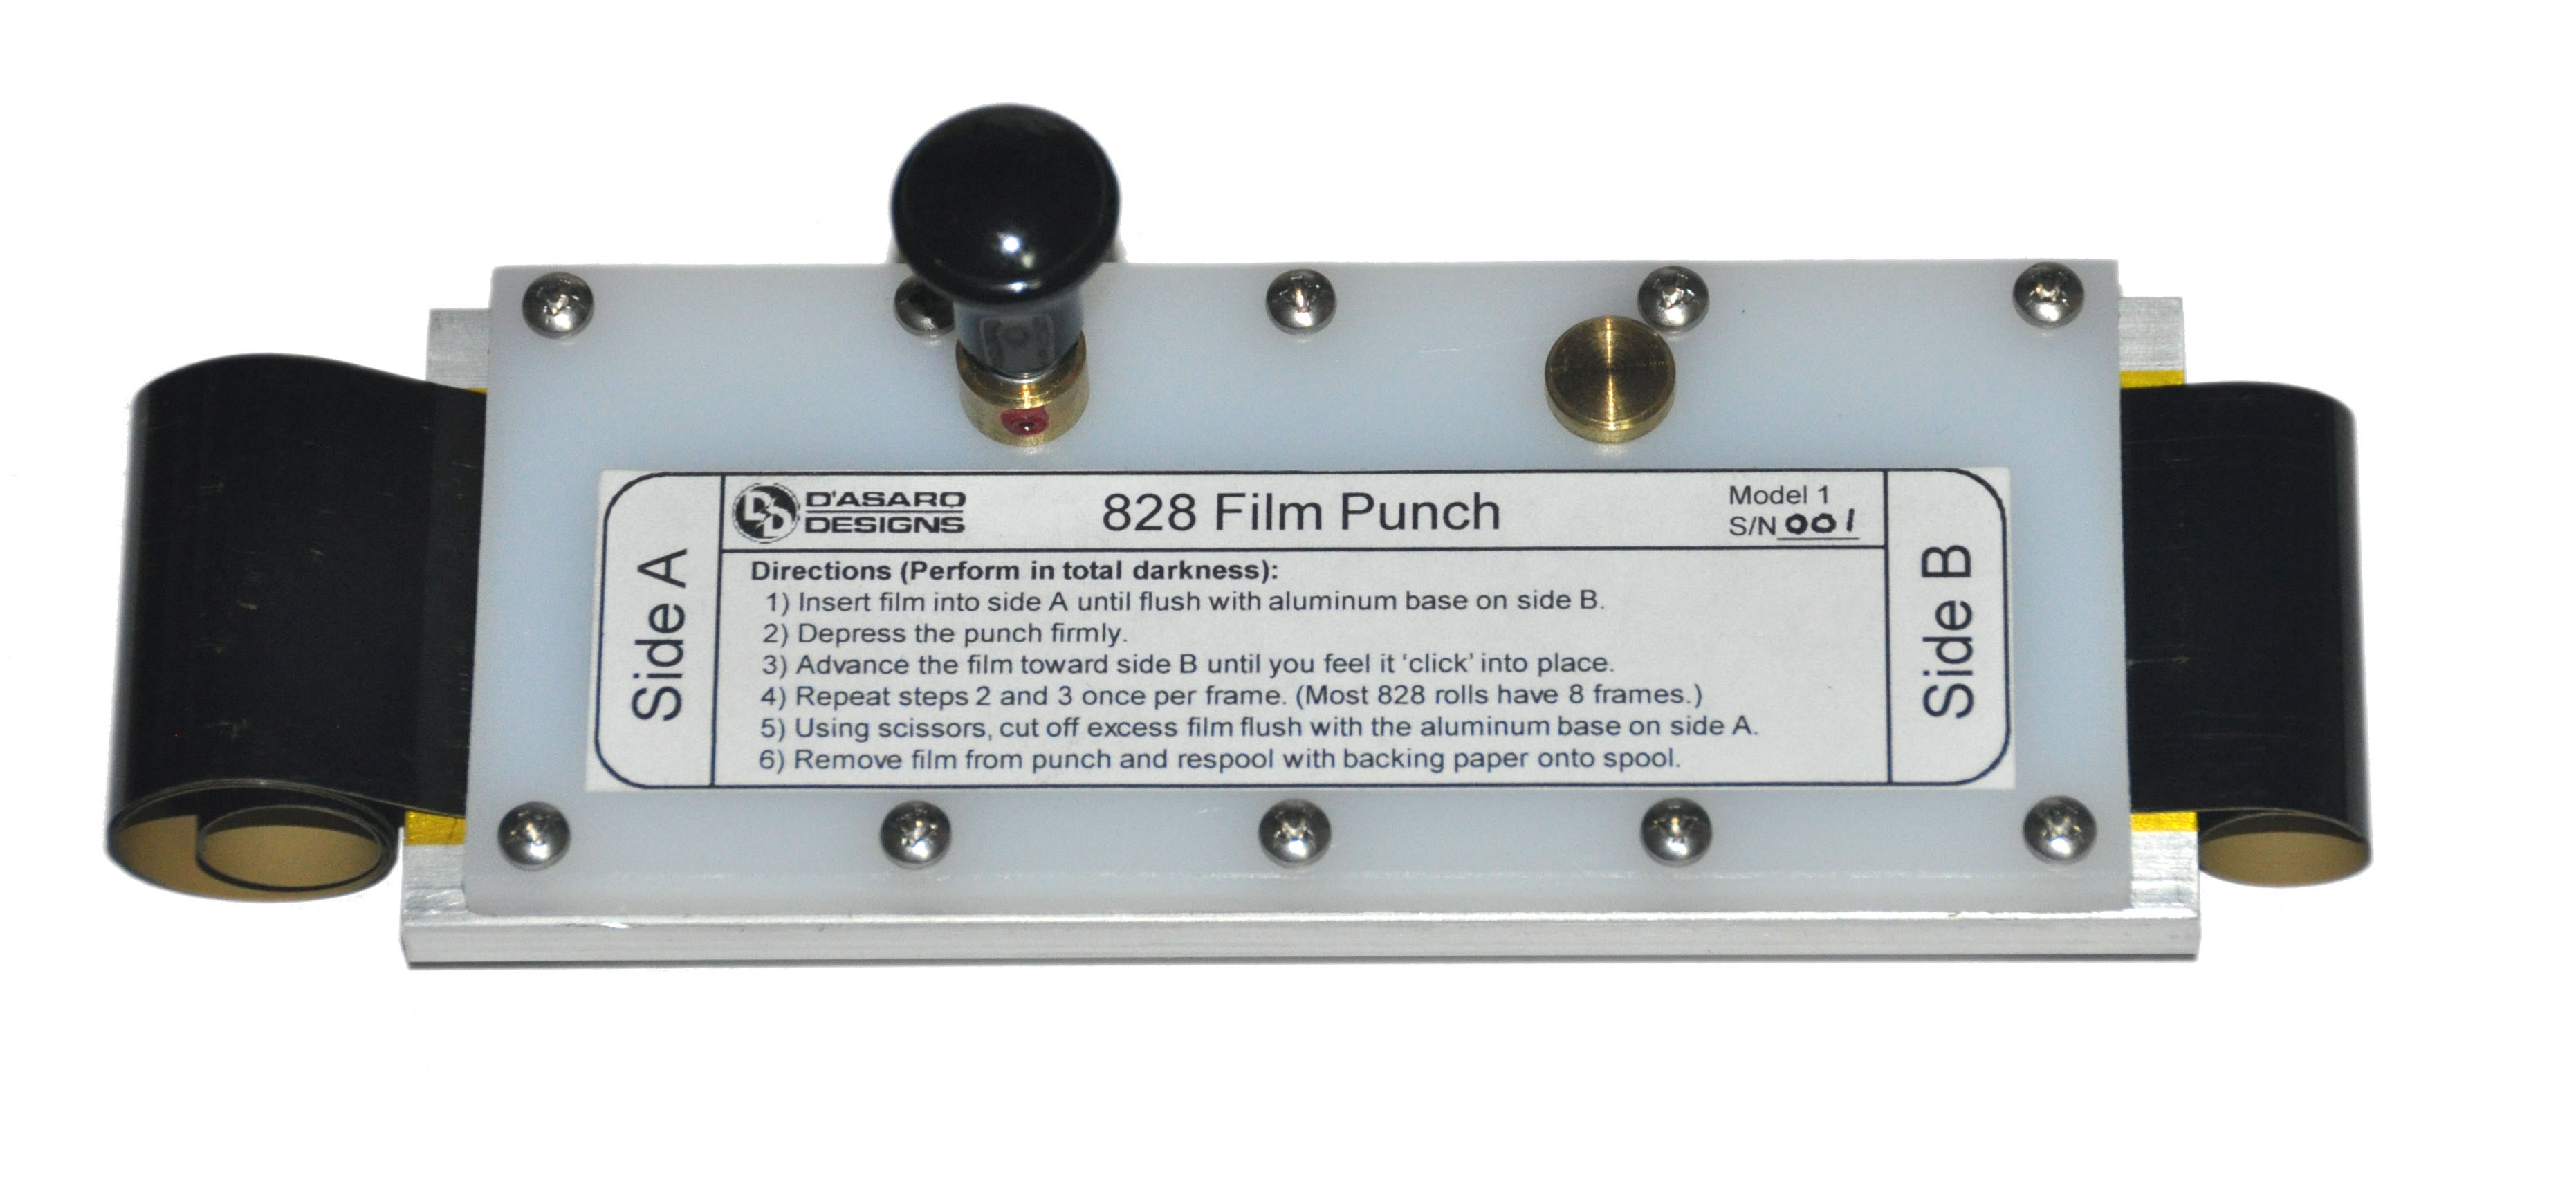
I verified the accuracy of the device by feeding my reference roll of 828 film through it and verifying that the punch lines up exactly with each hole. I have also verified the correct operation of the punching mechanism by punching holes in scraps of 35mm film. The photo below shows this sample roll in the punch.
As the project stands now, I have verified that the punch work correctly, but I do not yet have a source for unperforated 35mm B&W film to use in it, so I can’t yet sell 828 film for respooling. If you have any leads on where I might be able to buy some, please let me know. Else, if I strike out on that front (or maybe even if I do find a source) the next step will be to produce a precision film slitter to cut down 120 roll film to 35mm width. If this all works out well, and the strips of 828 film I produce sell well, my next step will be to make a similar punch for type 126 film. In any case, stay tuned.
Finally, I have started a thread about this project at apug.org. Check it out for some more information and feedback from other readers.
As much as I would love to make these devices available to anyone who wants one, I will not be selling them on the open market – I don’t have the facilities to produce these in any kind of quantity. However, if you have access to a machine shop and you want to build this device yourself, I am releasing the full design here. This document includes a complete parts list, a complete set measured drawings, machining instructions, and assembly instructions. Note that it is available for PERSONAL, NON-COMMERCIAL USE ONLY. In short, you are welcome to use the plans to build the punch yourself, but you must contact me to work out a commission if you wish to sell either the punches or a significant fraction of the film produced with them.
Just saw your note about your device. A great innovation! I’ve just acquired a Bantam Special — I owned one half a century ago when working my way thru college in an Eastman Kodak Store, and foolishly traded it in on a Rollei. Now that I’ve got my little jewel back, I’m hoping you’ve found a source of unperforated 35mm stock and that you’re selling 828 film and/or your device for home loaders to use. Please advise. Jim
Thanks for your comment and your interest! I am glad you enjoyed my post. As far as the search for unperf 35mm film goes, I have kind of struck out. As it stands now I am planning on building a film slitter to slit down 120 film. Unfortunately, this means that each strip will cost about $7, maybe a little more, since I have to buy a $5 roll of 120 for each one. Anyway, I will post here when I have the slitter done.
This is great! I have been thinking about something similar, but really never got very far.
I found this film, but it is color film stock. If you search this site for “non-perforated” you will also find some portra film stock.
http://www.ultrafineonline.com/ko35x100ftpr1.html
There is also the Ilford ULF program where ilford accumulates orders for less common film sizes and will batch these together once a year. I think they would run non-perforated 35 mm. Just don’t know what their minimum run would be. One of the participating resellers for the program could possibly have some idea of that. Check out the ilford ULF program.
Thanks for the replay and your hints on finding film. I am aware that I can buy unperforated C-41 color film, but since people can’t easily develop that at home I haven’t been very interested in getting some. That said, I really like the idea of the Ilford ULF program you mentioned. How would I go about getting more information about that and finding out if I could get unperferated 35mm B&W.
828 has a 40 x 28 mm format and 135 is 34 x 24 mm. What spacing are you using for pin holes and any idea how close you can squeeze them before the exposures overlap?
Please see the diagram here: http://www.dasarodesigns.com/wp-content/uploads/2014/09/828-Film.png (also in the article). It shows all the spacings. As far as ‘squeezing them’ that is not my intent – I am using the same hole spacing as defined by Kodak. That all said, I have never found unperforated 35mm film and my attempts at building a film slitter to cut down 120 film have so far been unsuccessful, thus the punch has never actually been used to create working 828 film.
You really need to offer these for sale.
I recently bought a splitter from Etsy to cut down 120 for both 127 and 828 size film.
https://www.etsy.com/listing/225327885/film-slitter-to-cut-any-roll-film?ref=shop_home_active_2
Thank you very much for pointing me to that product! I just ordered one so I will FINALLY have a way of slitting 120 down so I can actually try out my film punch. If that works, I will soon be selling slit and punched strips of 828! As for selling the punches themselves, I don’t have the resources to make these in number. It took me MONTHS of work to make the single one I have. If anyone wants to figure out how to have these manufactured (say in China) I am more then happy to license the design and work with you to make it happen.
-Matthew
Hi Matthew,
I am interested in helping you get this project off the ground. I think your use of a ball detent mechanism is rather ingenious. I am also mechanically inclined, very interested in the 828 format, and potentially willing to invest some capital in the idea. Please contact me.
-Christian
Hi,
Any updates on this?.
I looked at the Ilford ULF minimum batch runs, its a lot and they don’t run it if there are not enough orders to cover the run. Plus its not cheap.
I myself am interested in 126 film. Backing paper and finishing it so the backing paper holes match the film is one headache… then there’s the lack of cassettes.
Mick
Thanks for the comment. I have it working. Mostly. I bought a film slitter (https://www.etsy.com/listing/266829907/film-slitter-to-cut-any-roll-film?ref=related-3) and have tried cutting down 120 film. This seems to work OK, but the resulting film width is not very precise. The aluminium punch dulled quickly and no longer makes perfectly shaped holes and sometimes leaves hanging chads – I should really make another one out of steel. Also, where the detent ball rubs on the film it leaves a black streak. This is outside the picture area so it should be OK. The biggest problem, is that my 828 camera turned out to have numerous light leaks in the bellows, ruining all the photos I tried to take on the 828 film I made with this thing. I need to have new bellows made for it (http://www.turnerbellows.com/photographic_bellows.html) but I haven’t gotten around to having that done yet.
-Matthew
Hi, I’m interested in buying some 828 film if you’ve got to that point yet? So glad someone’s doing this! Thanks!
Sorry. I don’t have any film (or anything else) for sale right now. I moved across the country to start a new job in Seattle and that (the new job) is taking all my time.
-Matthew
Many, many years ago in an emergency situation I had to cut down large rolls of aerial film to fit another camera. I made up a spindle device that was powered by a slow geared electric motor that spun the roll at about 200rpm (if memory serves me right). I then made a clamping device that would hold a scalpel so the blade rested on the roll at the cutting point, a coil spring was used to hold the scalpel against the roll and I could vary the pressure of the spring with a protruding arm.
The result wasn’t perfect as I was cutting down 100′ rolls and despite the clamp the cutting point drifted. The scalpel blades also had to be replaced at quite regular intervals, but it got us over an otherwise serious situation. This all had to be done in complete darkness as the film had extended red sensitivity and I couldn’t use the available IR headset, but it worked. I’m sure something similar could cut down a standard roll of 120 film including it’s backing paper, and with more accuracy. Some fogging along the line of the cut may occur but providing the spring pressure is not too great it should not impinge into the image area.
Have you tried 35mm microfilm? It’s the right width and most of it is unperforated.
Thanks for the comment. I like the idea of using microfilm, but a quick Google search didn’t turn up anyone selling it. Do you know if it is still made?
Matthew
126 has an (arguably) bigger market viability over 828–considering the amount of cheap camera stock out there–not to mention a huge interest in Ferrania making the film in the future (though they are certainly not interested in making any commitments to that effect.)
If you decided to actually secure funding for making these machines, I’m sure a Kickstarter project would be quite successful. Considering there is now the Fakmatic re-loadable 126 cartridge. All we need now, is a (fairly) easy way to perforate film.
In other words–if you can find a way to make these to order, you’re sitting on a goldmine.
Thanks! Very good suggestion. I am too busy with work right now and I don’t have a place of my own where I can setup a shop right now but if/when I get back to this I will strongly consider 126 film.
-Matthew D’Asaro
I have a Bantam RF that doesn’t use the single perf per frame on original 828 film — it has a friction roller that runs on the perforated edge of the film (outside the image area) instead.
For this, I’ve hand cut 120 (marked 35mm on the edge of the film that has the 6×4.5 framing numbers — which produces a roll that barely fits on an 828 spoo. This will give 16 frames on a roll in any 828 camera, by using the framing window just as with a medium format folder or box camera, and gives 18 in the Bantam RF (because that gives 42mm advance, instead of the 47 mm of the backing paper marks) — by marking the backing paper on a new roll, chucking one spool flange in my 7×12 mini-lathe and supporting the hole in the other flange with the dead center in the tailtock, spinning the roll, and holding a utility knife on the mark.
Yes, in daylight. The fogging at the cut is so narrow I’ve never seen it in the image area. Once cut to the spool core (or through, doesn’t seem to matter), I take the 35mm roll into the darkroom or changing bag and respool it onto an 828 spool, recutting the tail and leader to fit the spool slot in the process.
No, this isn’t “properly” perfed, but it’ll work for anyone used to using a box camera or most folders, or in a camera that uses a friction wheel like the Bantam RF. Feeding the cut roll, backing and all, through your perforating device would give you a roll that works the way you want in conventional 828 cameras — the frame numbers in the window won’t read correctly after Frame 1, but the auto-stop for the advance will. This eliminates the problems with recycling 50+ year old 828 backing, getting only 8 or 12 frames on a roll (yes, 828 was eight frames originally, but came in both 8 and 12 by about 1960), and lets you use any emulsion available in 120 (not the selection there was in 2014 in 35mm, but still a good number of B&W and several in color.