How to replace a Circline ballast:
NEW: See this document for directions on rebuilding LG/GoldStar gb4x32 277v Instant Start Electronic Ballasts
Once you have determined that you need to replace your ballast (see troubleshooting) the next step is to determine the replacement ballast that you will need. Depending on your fixture, this can range from trivial to difficult.
In order for you to get all of the necessary information to replace your ballast, you need to remove it. If you did not do so earlier, make sure you have shut off the power for the fixture at the circuit breaker box. Or if it is portable lamp, unplug it before continuing. A word of warning if your fixture is old, before 1979, you should call for a professional as your ballast probably contains highly toxic PCBs. For more information see http://www.state.nj.us/health/eoh/peoshweb/pcbib.htm
For a fixture mounted on the ceiling, follow these directions:
 |
 |
Detach the wire nuts that hold the wires from the ballast to the ones from the ceiling by turning the wire nuts counterclockwise. Now remove the fixture. The ballast will either be on the top of this fixture or on the bottom. In any case, it will be held on by 1 or 2 screws. Remove these. Pull the 2 sets of wires that would be attached to the lamps out of the holes they run through. The connectors on the ends might be a little tight but they will fit.
For a floor or desk lamp, follow these directions:
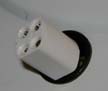
If you are trying to replace the ballast in a Circline adapter, (a round plastic thing that screws into a standard light bulb socket and has a place to snap a Circline lamp in around the outside), it is not easily possible. Replace the whole adapter unit.
The ballast on a desk or floor lamp may not be standard, so a replacement may be hard to get. It may also be hard to locate in the lamp. It will usually be warm start (pre-heat) which means there will be a starter with it, or you have to hold down a button to start the lamp(s). If there is a "can" near the bottom try opening this up since the ballast is probably inside. Also try looking under the base of the lamp if it looks big enough. Once you have found the ballast, remove the wire nuts or cut off the crimp nuts. If it is in a can it will probably just lift out with a little force. Otherwise it is probably screwed in, so find and remove the screws.
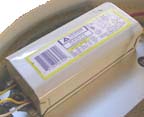
Now that you have removed the ballast get the following information.
 |
 |
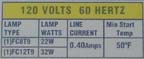 |
1. The number on the lamp(s) in your fixture: This will probably be FC6T9, FC8T9, FC12T9, or FC16T9. Some fixtures will have more than one type of lamp in them, so get all of the numbers. Some older fixtures have FCxT10 lamps where x is 6, 8, 12, or 16. These lamps are compatible with newer standard FCxT9 lamps. If your lamps don't have numbers, you can look at the ballast label to see what they should be.
2. The voltage of the fixture: This will probably be 110 or 220. If it is in a standard home it will probably be 120. This is also written on the label of the ballast.
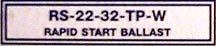
3. What kind of ballast your fixture has: The types that are most often used with Circline fixtures are Pre-Heat (warm-start), Instant Start and Rapid-Start. If you have a starter which is a little plastic or metal can that has to be replaced occasionally in your fixture, then your fixture is warm start. The starter can will usually be poking out under the cover (if there is one) where the lamps are. Look at the label of the ballast. It will be marked as Rapid-start, Instant-start or maybe even Trigger-start.
4. What the form factor of your ballast is: This means what kind of box it is in. You get this information by removing the fixture and measuring the ballast. The most important measurement is the distance between the center of each screw hole or slot on the ballast but write down all of the dimensions anyway.
Now that you have all of the information you need, see if you can get the replacement ballast. There are several ways you can do this. You can go to Home Depot or Lowes and see if they have the ballast you need, but I recommend looking it up on the internet first. The advantage of this is that there are many more ballasts that you can order on the internet than hardware stores stock. There are several manufacturers of ballasts. The one I recommend is Advance Transformer (http://www.advancetransformer.com). Their online catalog is the best out there and they make the largest variety of ballasts on the market. If you like someone else, for instance Sylvania, theirs will work too.
Use the information you got earlier to find your ballast in the online catalog. When you find the ballast you need on the internet, you can order it there, or if it is a fairly standard one, buy it at your local hardware store.
Install the new ballast in the same way that you removed the old one. Make sure that you connect the wire nuts securely and that no bare wire shows from under them. Make sure that the wires that connect to the lamp(s) are through the appropriate holes so that they connect to their appropriate lamps. For a ceiling fixture, make sure that you connect up the ground wire to preferably a dedicated ground screw (a small green screw usually marked GND) or if there is none, to one of the ballast mounting screws. As I said earlier, if you are not comfortable with these things then get professional help. Remount the fixture making sure no wires get caught under it, and reinstall the lamps and the cover.
Now for the moment of truth! Turn on the power at the circuit breaker box and then turn on the switch to your Circline fixture. If it works, congratulations! If it does not light up, see "Troubleshooting."